What is WCID?
A WCID device, where WCID stands for «Windows Compatible ID«, is an USB device that provides extra information to a Windows system, in order to facilitate automated driver installation and, in some circumstances, allow immediate access.
WCID allows a device to be used by a Windows application almost as soon as it is plugged in, as opposed to the the usual scenario where an USB device that is neither HIDnor Mass Storage requires end-users to perform a manual driver installation. As such, WCID can bring the ‘Plug-and-Play’ functionality of HID and Mass Storage to any USB device (that sports a WCID aware firmware).
WCID is an extension of the WinUSB Device functionality, put forward by Microsoft during the Windows 8 Developer Preview and that uses capabilities (Microsoft OS Descriptors, or MODs) that have been part of Windows since Windows XP SP2.
As of May 2012, an automated WinUSB WCID driver is provided on all platforms starting with Windows Vista. On Windows 8 or later, it is native to the system which means there is no need to go online for the driver to be installed, whereas, for Vista and Windows 7, it will be obtained from the internet, through Windows Update.
History
Before WCID, only USB devices that belonged to a well supported class such as HID(USB keyboards, mice, joysticks, etc.) or Mass Storage (USB disk, flash based storage, media players such as iPods, etc.) required no intervention for driver installation, since Windows took care of it automatically the first time the device was plugged in. On the other hand, other devices usually required the to manually provide and install the driver themselves. This detracted from ease of use and limited the the ability of people, who aren’t familiar with the driver installation process on Windows, to use generic USB applications such as the ones based on libusb, LibUsbDotNet, libusb-win32, libusbK orWinUSB.
However, the methods for automated driver installation of HID or Mass Storage devices (reliance of a common class, instead of a specific device ID) and the method of providing specific OS related device information (Microsoft OS Descriptors), which have been present since Windows XP SP2, can actually be combined to allow for the automated driver installation of any type of USB device.
In 2011, WCID was put forward by Microsoft in the Windows 8 Developer Preview, through an updated WinUSB driver, and was confirmed to be applicable for more than just WinUSB devices.
In 2012, Microsoft also added the WinUSB WCID driver files to Windows Update, with the effect of bringing WCID capabilities and automated WinUSB driver installation to other recent versions of Windows.
As it greatly enhances user experience, WCID is now being leveraged in USB devices such as Android devices, benchmark devices, with many more expected to follow.
Example
The following is a screenshot of a «WINUSB» WCID device as detected by Zadig.
On Windows Vista or later, this device, which is neither HID nor Mass Storage, sees a driver installed automatically without any form of user intervention through either Windows Update (Windows Vista, Windows 7) or natively (Windows 8).
The same can also be achieved on Windows XP SP2, if a WinUSB WCID driver (i.e. a generic driver) has been installed at least once.

WCID for end-users
What WCID means for end-user is that, as long as a device is WCID, and a WCID driver with the same generic compatible ID is either available on the system or from Windows Update, no manual driver installation will be required when plugging the device. Instead, Windows will perform the driver installation automatically.
Moreover, an application such as Zadig can ensure that even on platforms where a WCID driver is not provided by Microsoft (eg. XP SP2) or when non Microsoft USB drivers are used (libusb0, libusbK), WCID can still be enabled through a one-time WCID driver installation so that, when you plug a WCID device in the future, you won’t have anything to do.
Thus, if you are an end-user, and the device you want to use is neither HID or Mass Storage, you should ask the manufacturer whether it is WCID compatible. If not, you should ask them whether they can update the device firmware and convert it to WCID, which is very easy for them to do, as this means it will greatly enhance your user experience.
All in all, once manufacturers start using WCID, you should find that almost any USB device on Windows can actually become Plug-and-Play and that cumbersome USB driver installations will have become a thing of the past.
WCID for manufacturers
Obviously, the main advantage of WCID for device manufacturers is that it alleviates the need to provide your own drivers or your own custom driver installer application, as well as educate users with regards to driver requirements for devices that do not belong to well established USB classes. It also alleviates the need to go through WHQL, for every single device you produce, should your users want to obtain your driver through Windows Update.
For end-users not running Windows Vista or later, or if you choose to use libusb-win32 orlibusbK to develop your application, you can simply either provide a one-time WCID driver installer application, such as Zadig or libwdi’s wdi-simple (both of which being Open Source and customizable to your needs), as these applications can install the WCID version of the WinUSB, libusb-win32 or libusbK drivers.
Also, while WCID requires the addition on additional descriptors, a lot of effort has been devoted in this page to ensure that you have all the information required to deploy WCID quickly and painlessly (i.e. near zero-cost), especially as the simple registry checks detailed below, the use of Zadig or the use of other test applications such as the libusbsample application xusb (a Windows binary version of which is also available here) or Linux’s usb-utils (when updated to dump Microsoft OS Descriptors) can help validate whether your descriptors have been properly set.
For examples of actual WCID device implementations for AVR and PIC, as well as a typical WCID USB query trace, please have a look at the Examples section.
If positive customer experience is one of your priorities, and you want to reduce both development and support costs, you should seriously consider implementing WCID into your next device.
Implementation
You can find below an extended description of how WCID driver installation works on Windows, as well as the means you can use to confirm that your device is properly set for WCID.
Important: Only USB 2.0 devices or later can be recognized as WCID. As per the following:
Thus your Device Descriptor’s bcdUSB field must be set to 0x0200 or higher.
Of course, this does not mean that your device has to operate at High Speed. It just means that your device complies with the USB 2.0 Specifications or higher.
Microsoft OS String Descriptor
The following table details how exactly the Microsoft OS String Descriptor should be set in your firmware:
| Value | Type | Description |
|---|---|---|
| 0x12 | BYTE | Descriptor length (18 bytes) |
| 0x03 | BYTE | Descriptor type (3 = String) |
| 0x4D, 0x00, 0x53, 0x00, 0x46, 0x00, 0x54, 0x00, 0x31, 0x00, 0x30, 0x00, 0x30, 0x00 | 7 WORDS Unicode String (LE) | Signature: «MSFT100» |
| 0x## | BYTE | Vendor Code |
| 0x00 | BYTE | Padding |
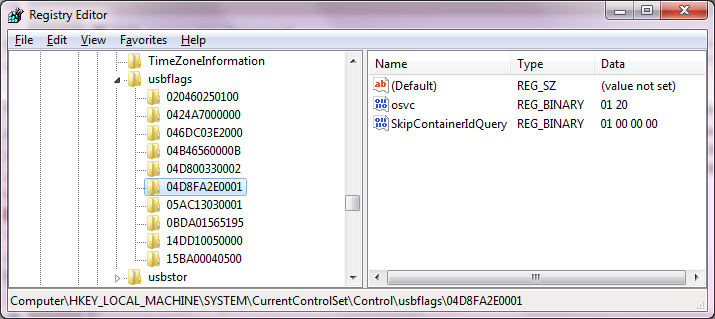
In the example above, the Vendor Code was set to 0x20 in the firmware. Thus, you can easily find out if Windows has been able to read a valid OS Vendor signature from your device by checking the registry.
Microsoft Compatible ID Feature Descriptor
If the osvc is valid, then additional Microsoft-defined Feature Descriptor are issued, with each call being broken down by the OS into header retrieval, to find the size, and then full payload retrieval (thus a device should see twice as many requests as calls that are issued).
At least one of these calls is for the Compatible ID Feature Descriptor
In its simplest form, and as documented here the format of the data packet is as follows:
| Value | Type | Description |
|---|---|---|
| 0x28, 0x00, 0x00, 0x00 | DWORD (LE) | Descriptor length (40 bytes) |
| 0x00, 0x01 | BCD WORD (LE) | Version ( ‘1.0’ ) |
| 0x04, 0x00 | WORD (LE) | Compatibility ID Descriptor index ( 0x0004 ) |
| 0x01 | BYTE | Number of sections (1) |
| 0x00, 0x00, 0x00, 0x00, 0x00, 0x00, 0x00 | 7 BYTES | Reserved |
| 0x00 | BYTE | Interface Number (Interface #0) |
| 0x01 | BYTE | Reserved |
| 0x57, 0x49, 0x4E, 0x55, 0x53, 0x42, 0x00, 0x00 | 8 BYTES (NUL-terminated?) ASCII String | Compatible ID ( «WINUSB\0\0» ) |
| 0x00, 0x00, 0x00, 0x00, 0x00, 0x00, 0x00, 0x00 | 8 BYTES (NUL-terminated?) ASCII String | Sub-Compatible ID (unused) |
| 0x00, 0x00, 0x00, 0x00, 0x00, 0x00 | 6 BYTES | Reserved |
You can then check if the Compatible ID was properly read from your device by browsing the registry’s HKEY_LOCAL_MACHINE\SYSTEM\CurrentControlSet\Enum\USB tree at the location of your device. Similarly to the osvc key which is created on first insertion, you should find an entry with the VID and PID of your device under USB (eg: VID_04D8&PID_FA2E ).
Here is an example of the registry entry created from the Compatible ID Feature Descriptor ( «WINUSB» ):
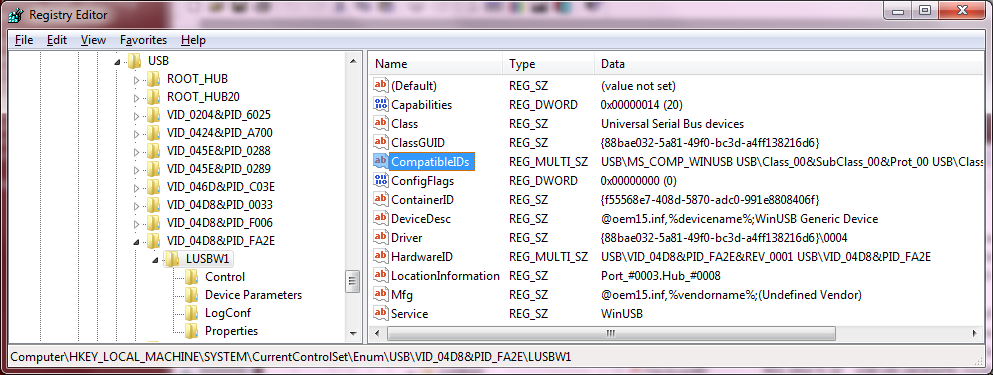
If you can find an USB\MS_COMP_XXXXXXXX entry for your device (here USB\MS_COMP_WINUSB ), then your device qualifies as a WCID device. In other words, defining a Microsoft OS String Descriptor and a Microsoft Compatible ID Feature Descriptor in your firmware is all that’s needed to turn it into a WCID device and benefit from the automated driver installation feature of Windows.
Other Compatible IDs than «WINSUB» can also be used according to the driver you want to automate the installation of. The following table provides a reference of which Compatible ID string you should use, according to the type of application you want to use your device with:
| Compatible ID String | Application Type |
|---|---|
| «WINUSB\0\0» | libusb application LibUsbDotNet application native WinUSB application |
| «LIBUSB0\0» | libusb-win32 application LibUsbDotNet application |
| «LIBUSBK\0» | libusbK application LibUsbDotNet application |
Windows Automated Driver Installation
The WCID automated driver installation process is best illustrated through the native automated WinUSB driver installation of Windows 8.
Here again, there are two requirements that must be met to allow for the automated installation of a device driver.
First, the inf file must include USB\MS_COMP_XXXXXXXX as a device identifier string. In Windows 8 (x64), if you look at the winusb.inf from your \Windows\System32\DriverStore\FileRepository\winusb.inf_amd64_50cb26e12c0e99f2\ (or similar), you will find that this is indeed the case see:
In comparison, the winusb.inf you’ll find at the same location in Windows 7 is missing a [Manufacturer] section pointing to a compatible ID (but the winusbcompat.inf downloaded from Windows Update has it).
As both these conditions are met by default for the WinUSB driver on Windows 8, it becomes possible to plug in a WinUSB WCID device (i.e. a WCID device that returns «WINUSB» for the Compatible ID Descriptor) and have its driver installed automatically: once Windows has populated the CompatibleIDs list in the registry, it will search the inf repository for a match, and if it finds one, install the relevant driver.
This whole process is actually nothing new, as a the same occurs for USB Class devices, such as HID or Mass Storage, where the USB\Class_. entry is used for the match. For instance, if you look at input.inf from DriverStore\ you would see:
and USB\Class_03 is what you would find as one of the CompatibleIDs string for an HID Joystick for instance.
Defining a Device Interface GUID or other device specific properties
If you read the Microsoft documentation, you will find that Microsoft OS Descriptors can be used for more than just WCID, at WCID is only a subset of it. For instance, they can be used to provide icons, URLs or other data.
IMPORTANT NOTE 1: There is a bug/limitation in WinUSB that will force the wIndex of any Interface Request to the interface number. This means that, if you are using WinUSB to verify the content of your Extended Properties Feature Descriptor, you won’t be able to retrieve it (unless it is only defined for interface #5).
If you use WinUSB on Windows to validate your descriptors, our advice then is to have your device firmware answer both Device and Interface requests when the Extended Properties Feature Descriptor is queried, so that you can use a Device Request rather than an Interface Request to validate that your descriptor is set properly. For reference, the latest xusb sample application from libusb has a -w switch that will force the wIndex = 0x0005 to use the Device mode.
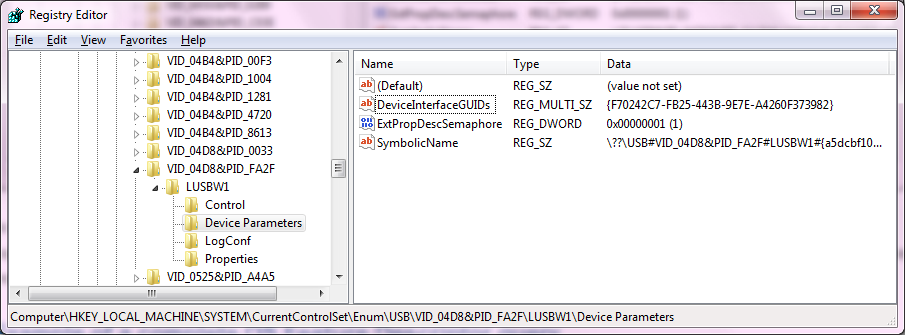
IMPORTANT NOTE 2: The official Microsoft documentation shows the definition of aDeviceInterfaceGUID as a REG_SZ, and this is what the sample firmwares we provide at the end are defined with. However, if you are using a device with multiple interfaces, you may run into an issue where issuing a registry query to get the Device Interface GUIDs will not return the GUID of the WCID interface when it isn’t the first one, unless you set your Extended Properties to return a DeviceInterfaceGUIDs property (with an s) as aREG_MULTI_SZ, to define your GUID. The use of DeviceInterfaceGUIDs rather thanDeviceInterfaceGUID is what we illustrate below, so if you follow this guide, you should not run into this problem.
| Value | TYPE | Description |
|---|---|---|
| 0x92, 0x00, 0x00, 0x00 | DWORD (LE) | Descriptor length (246 bytes) |
| 0x00, 0x01 | BCD WORD (LE) | Version ( ‘1.0’ ) |
| 0x05, 0x00 | WORD (LE) | Extended Property Descriptor index ( 5 ) |
| 0x01, 0x00 | WORD (LE) | Number of sections ( 1 ) |
| 0x88, 0x00, 0x00, 0x00 | DWORD (LE) | Size of the property section (136 bytes) |
| 0x07, 0x00, 0x00, 0x00 | DWORD (LE) | Property data type ( 7 = Unicode REG_MULTI_SZ, see table below) |
| 0x2a, 0x00 | WORD (LE) | Property name length (42 bytes) |
| 0x44, 0x00, 0x65, 0x00, (. ) 0x73, 0x00, 0x00, 0x00 | NUL-terminated Unicode String (LE) | Property name «DeviceInterfaceGUIDs» |
| 0x50, 0x00, 0x00, 0x00 | DWORD (LE) | Property data length (80 bytes) |
| 0x7b, 0x00, 0x46, 0x00, (. ) 0x00, 0x00, 0x00, 0x00 | double NUL-terminated Unicode String (LE) | Property name » xxxxxxxxxxxx>\0\0″ |
The property data types that you can use are defined in the following table:
| Value | Type |
|---|---|
| 1 | NUL-terminated Unicode String (REG_SZ) |
| 2 | NUL-terminated Unicode String, that may include environment variables (REG_EXPAND_SZ) |
| 3 | Binary Data (REG_BINARY) |
| 4 | DWORD Value, little endian (REG_DWORD_LITTLE_ENDIAN) |
| 5 | DWORD Value, big endian (REG_DWORD_BIG_ENDIAN) |
| 6 | NUL-terminated Unicode String, that may include a symbolic link (REG_LINK) |
| 7 | Multiple NUL-terminated Unicode Strings (REG_MULTI_SZ) |
As you can see, the
Example of a complete OS Feature Descriptor query
For further details of the data that a WCID device, that also has the (optional) DeviceInterfaceGUID defined, should return, what follows is an example of what xusb against WCID-enabled Benchmark device. All the screenshots and data sections described above have been produced with this device. You can obtain a standalone xusb executable for Windows by downloading the latest Windows binary archive fromhttp://libusb.info.
WCID Advantages
WCID Drawbacks
WCID Device Examples:
For reference, an implementation of a typical Microchip PIC USB device firmware (with this diff providing an accurate indication of how much work is actually needed).
AVR (LUFA)
Also for reference, a simple LUFA based WCID firmware for Atmel AVR chips, that can be compiled using AVR Studio 5, is also provided here.
STM32
Another sample, for STM32 based (32-bit ARM Cortex) WCID devices, has been provided by Darren Kattan of Immense Networks. The sample is based on the USB Device Library V3.3.0, freely available on the ST website. Here is what Darren had to say about the samples:
Note that the only project that was modified in each library was the HID project.
Other
Finally, a Microsoft NetMon trace (using the USB extensions — for more details, please see this blog post) is also available here, that illustrates the USB queries your device will receive, and how it should answer them, the first time it is plugged on a Windows machine.
 radiospy_blog
 radiospy_blog
 RadioSPY blog
Инструкция по установке драйвера Zadig и программы SDRSharp. Возможные проблемы и их решение.
2. Скачать архив sdr-install.zip, распаковать и запустить sdr-install.bat. Все необходимые компоненты будут скачаны автоматически.
4. Запускаем SDRSarp.exe. В разделе Source нужно выбрать RTL-SDR / USB. В настройках  ставим галочку RTL AGC, усиление RF Gain добавляем до 30-40 дБ. В разделе Radio модуляция WFM, галочки FM STEREO и Correct IQ. Теперь можно нажать на старт
  и настроиться на какую-нибудь станцию FM диапазона.
Свисток не определяется, либо определяется но работает некорректно
Вероятные причины:
1. Не установился драйвер Задиг либо винда поставила свой. Запустить Zadig.exe и переустановить драйвер.
2. Слишком тонкий и длинный шнур USB, если свисток подключен не напрямую.
3. USB порт 1.1 (не поддерживается). USB 3.0 либо дает помехи, либо не работает вовсе. Оптимален порт 2.0.
4. Не хватает тока USB порта. На ПК такого не встречалось, но на дешевых планшетах бывает.
Чтобы проверить, нужно подключить свисток через USB HUB с внешним питанием.
Zadig выдает ошибку «The driver installation falled»
Драйвер не установится до тех пор, пока windows не установит свой, или не поймет, что у неё нет драйвера для этого устройства. Vasilii
Ошибка «1 compatible devices have been found but are all busy»
Запустить Zadig и кроме winusb обновить libusb (обе, win32 и k). artlover
Прием есть, но даже на FM очень слабый или вообще одни шумы
Как правило, не выставлено усиление в настройках программы. Также необходимо проверить контакт с антенной (разъем должен войти до щелчка). Можно попробовать открутить штырек и прикрутить провод длинной метра полтора.
Для очень слабых машин есть упрощенная программка.
Blog RadioSpy
радиоприем, программы, оборудование, etc…
RTL-SDR: возможные неполадки
Свисток не определяется в SDRSharp- «No device selected»
1. Не выбран источник RTL-SDR (USB)
2. Забыли запустить install-rtlsdr.bat. Если батник не срабатывает, можно скачать вручную (раз и два) и скопировать rtlsdr.dll из папки х32 (или х64, смотря какая разрядность системы) и Zadig в папку с Шарпом.
3. Не установили драйвер Zadig либо система поставила свой. Запустить Zadig.exe, поставить галочку list all devices и переустановить драйвер.
4. Слишком тонкий и длинный шнур USB.
5. USB порт 1.1 (не поддерживается). USB 3.0 может давать помехи, либо не работать вовсе. Оптимален порт 2.0.
6. Не хватает тока USB порта. На ПК такого не встречалось, но на дешевых планшетах бывает.
7. Если у вас современная материнская плата с USB3.0, USB3.1 — см. конец статьи.
Если ничего не помогает, нужно проверить, виден ли свисток вообще в системе. Мой компьютер — правой кнопкой — диспетчер устройств, либо Zadig — Options — List all devices. Нужно вытащить и воткнуть свисток обратно, и посмотреть, что исчезает/появляется. Если ничего, то брак.
Zadig выдает ошибку «The driver installation falled»
Драйвер не установится до тех пор, пока windows не установит свой, или не поймет, что у неё нет драйвера для этого устройства. Vasilii
Ошибка «1 compatible devices have been found but are all busy»
Запустить Zadig и кроме winusb обновить libusb (обе, win32 и k). artlover
Похожий рецепт: удалить файлы libusb0.dll, libusbK.dll, and libusb-1.0.dll в директории System32 / SysWOW64 (У меня в Win7 x64 это было в SysWOW64) и переставить дрова Задигом. (AlexEX)
Прием даже на FM очень слабый или вообще отсутствует
Как правило, не выставлено усиление в настройках программы. Добавьте до 20-30. Также, необходимо проверить контакт с антенной (разъем MCX должен войти до щелчка). Можно попробовать открутить штырек и прикрутить провод длинной метра полтора. Иногда бывает обрыв кабеля в основании антенны.
Прерывается звук, тормозит отрисовка спектра
Не хватает ресурсов компьютера.
Рекомендации от Seapass (форум радиосканер):
1. На слабых машинах для запуска SDRsharp нужно убрать в диспетчере задач корректно все что лишнее и берет на себя ресурсы процессора (месенджеры, украшательства итд).
2. В свойствах системы в разделе «Параметры быстродействия» — выбрать «Обеспечить наилучшее быстродействие». Настроить видеоадаптер на работу в 16 бит цвете.
3. Запускаем SDRsharp или его модификацию. В настройках SDRsharp выбрать полосу 1 Мгц или если этого будет много для слабого процессора, то 250 Кгц.
4. В диспетчере задач приложению TSSDR.exe или SDRSharp.exe (в зависимости чем пользуетесь) — выставить высокий приоритет. Также высокий приоритет выставить процессу «taskmgr.exe».
5. Далее в самой программе SDRsharp:
Audio — снять галку «Filtr Audio» и выбрать режим вывода «MME»
FFT Display:
View — выбрать только спектр (Spectrum Analyzer)
Resolution — 2048 (и менее — на визуальный вкус)
S-Attack — мышкой в минимум и на клавиатуре кнопку вправо нажать два раза
S-Decay — аналогично
W-Attack — в минимум (хоть водопад и отключен предыдущей настройкой, но рекомендую)
W-Decay — аналогично
Speed — этот регулятор выставить в компромиссное для вас соотношение(загрузка цп/ скорость вывода графики)
Spectrum Offset&Range — поиграть параметрами так, чтоб шумовая дорожка была как можно
ниже на графике и уровни сигналов комфортные для восприятия (чем меньше графики выводится (а выводится она в SDRsharp коряво) тем меньше кушает ресурсов). В модификации SDRsharp есть кнопка отключения графики, которая существенно уменьшает нагрузку на процессор. Еще немного снижается нагрузка при уменьшении размеров окна программы (и тем более его сворачивании). Еще можно немного выжать путем убирания галки «Correct IQ», но может появиться зеркалка на спектре(делаем на свое усмотрение).
Zmej: еще там размер аудио буфера регулируется и в конфиг-файле системный приоритет, иногда помогает установка «нормального», т.к. по умолчанию стоит максимальный приоритет (256) и это иногда создает прерывистый звук. Вот такое значение
Для очень слабых машин есть упрощенная программка.
Не устанавливается драйвер на Windows 7
UA3VBD (форум cqham.ru): Была такая проблема на Windows 7-32. Не устанавливались драйвера DVB-T+DAB+FM, в том числе и через Zadig. Причина была в том, что после установки Windows отключил службу «Центр обновления Windows». Проблему решил — на время установки драйверов включил службу «Центр обновления Windows», потом её можно отключить.
Не работает на современном ПК
Если у вас современная материнская плата на процессорах Ryzen, Intel, с USB 3.0, 3.1, при этом у вас стоит Windows 7 x64 и ваш RTL SDR приёмник не определяется программами HDSDR, SDRSharp (сообщения No RTLSDR device found или No device selected ) — скачайте этот архив и следуйте инструкциям. (DX888, cqham)
DLL_для_USB3_0-3_1_HDSDR_SDRSharp.rar
DLL_for_USB3_0-3_1_HDSDR_SDRSharp.rar
Если Вы не нашли свою неисправность, посмотрите тут, а также в комментариях тут или тут.