Standalone Player Settings
This page details the Player Settings specific to standalone platforms (Mac OSX, Windows and Linux). A description of the general Player Settings can be found here.
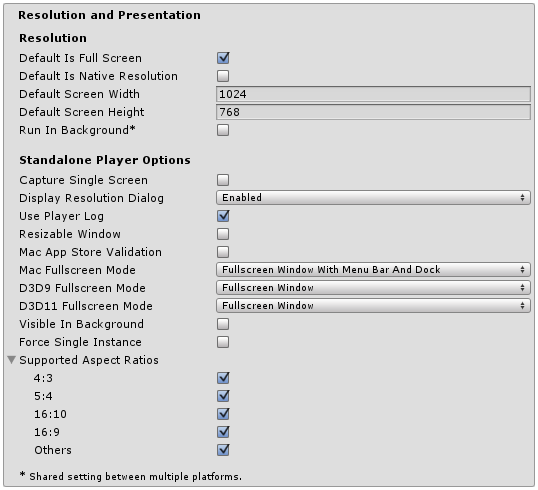
Resolution And Presentation
| Свойство: | Функция: |
|---|---|
| Разрешение экрана | |
| Default is Full Screen | Should the game start in fullscreen mode by default? |
| Default Is Native Resolution | Should the game use the default resolution used on this machine? |
| Default Screen Width | Default width of the game screen in pixels. |
| Default Screen Height | Default height of the game screen in pixels. |
| Run in background | Should the game keep running (rather than pausing) if the app loses focus? |
| Настройки Проигрывателя Автономной сборки | |
| Capture Single Screen | If enabled, standalone games in fullscreen mode will not darken the secondary monitor in multi-monitor setups (no longer supported on Mac OS X). |
| ###Настройка вашего диалогового окна для выбора разрешения (Resolution Dialog) | Should the game start with a dialog to let the user choose the screen resolution? The options are Disabled, Enabled and Hidden by Default (ie, the dialog only appears if the alt key is held down at startup). |
| Use Player Log | Вести лог-файл с отладочной информацией. Если вы планируете разместить ваше приложение в Mac App Store, вы захотите снять галочку с этого свойства. Выбрано по умолчанию. |
| Resizable Window | Позволяет пользователю изменять размеры окна проигрывателя автономной сборки. |
| Mac App Store Validation | Включает проверку чека для Mac App Store. |
| Mac Fullscreen Mode | How should fullscreen mode operate on MacOSX? The options are Capture Display (ie, Unity takes over the whole display and the user cannot switch apps until fullscreen mode is exited), Fullscreen Window and Fullscreen Window with Menu Bar and Dock. |
| D3D9 FullScreen Mode | Default fullscreen mode when using DirectX 9. |
| Exclusive Mode | Sets the Default Fullscreen mode to encompass the whole screen without a window surronding it. |
| Fullscreen Window | Keeps the game in a window when in fullscreen. Better for allowing the game to run in the background. |
| Exclusive Mode | Sets the Default Fullscreen mode to encompass the whole screen without a window surrounding it. |
| Fullscreen Window | Keeps the game in a window when in fullscreen. Better for allowing the game to run in the background. |
| Visible in Background | On Windows, show the application in the background if Fullscreen Windowed mode is used. |
| Force Single Instance | Restrict standalone players to a single concurrent running instance. |
| Supported Aspect Ratios | The aspect ratios that will appear in the Resolution Dialog at startup (as long as they are supported by the user’s monitor). |
Splash Image
Other Settings
API Compatibility Level
Детали
Настройка вашего диалогового окна для выбора разрешения (Resolution Dialog)
В Standalone проигрывателе у вас есть возможность добавить своё баннерное изображение для диалогового окна Screen Resolution. Максимальный размер изображения равен 432 x 163 пикселям. Изображение не будет масштабировано до соответствия выделяемой области экрана. Вместо этого оно будет отцентрировано и обрезано.
Publishing to the Mac App Store
Use Player Log позволяет вести запись в лог файл вместе с отладочной информацией. Полезно в случаях, когда нужно разобраться в проблемах, которые возникают в вашей игре. При публикации игр для магазина Apple’s Mac приложений рекомендует отключать эту опцию, так как Apple может отклонить ваш запрос. См. для дополнительной информации по лог файлам эту страницу руководства.
Use Mac App Store Validation enables receipt validation for the Mac App Store. If this is enabled, your game will only run when it contains a valid receipt from the Mac App Store. Use this when submitting games to Apple for publishing on the App Store. This prevents people from running the game on any computer then the one it was purchased on. Note that this feature does not implement any strong copy protection. In particular, any potential crack against one Unity game would work against any other Unity content. For this reason, it is recommended that you implement your own receipt validation code on top of this using Unity’s plugin feature. However, since Apple requires plugin validation to initially happen before showing the screen setup dialog, you should still enable this check, or Apple might reject your submission.
Windows Store Apps
При создании решения в Visual Studio в первый раз, большинство этих настроек помещается в Package.appxmanifest.
Note: If you build your project on top of the existing one, Unity won’t overwrite Package.appxmanifest file if it’s already present, that means if you change something in Player Settings be sure to check Package.appxmanifest, if you want Package.appxmanifest to be regenerated, simply delete it, and rebuild your project from Unity.
To read more about App package manifest, please visit http://msdn.microsoft.com/en-us/library/windows/apps/br211474.aspx.
Settings from Packaging, Application UI, Tile, Splash screen, Capabilities directly transfer to settings in Package.appxmanifest file.
Certificate
Каждому Windows Store приложению необходим сертификат, определяющий его разработчика. Если разработчик не предоставит свой сертификат, то Unity создаст для него стандартный.
Compilation
Когда Compilation Overrides установлен в:
Plugins
Необработанные плагины содержат список плагинов, которые были проигнорированы инструментами предварительной обработки Unity (как например SerializationWeaver, AssemblyPreprocessor, rrw), обычно вам не нужно вносить изменения в этот список, до тех пор пока вы не получите ошибку о том, что Unity не смог обработать ваш плагин.
Что произойдёт если вы добавите в этот список плагин?
Unity не вводит в вашу сборку, используемую для сериализации дополнительный IL код, и если ваш плагин не ссылается на библиотеку UnityEngine.dll, то ничего страшного, потому что Unity не должен сириализировать данных из вашего плагина.
Independent Input Source
Делает доступным выбор опции для “независимого источника ввода”, подробнее о котором вы можете прочитать здесь. В основном благодаря ввод становится более чувствительным, и обычно лучше оставлять эту опцию активной.
Low Latency Presentation API
Платформенно зависимая компиляция
Unity включает в себя функцию под названием “Платформенно зависимая компиляция”. Она состоит из некоторых директив препроцессора, которые позволяют вам разделить свои скрипты для компиляции и выполнения части кода исключительно для одной из поддерживаемых платформ.
Кроме того, вы можете запустить этот код в редакторе, таким образом, вы можете скомпилировать код специально для вашего мобильного/консоли и проверить его в редакторе!
Определения платформ
Определения платформ для ваших скриптов, которые Unity поддерживает:
Также вы можете скомпилировать код избирательно, в зависимости от версии движка. В настоящее время поддерживаются: Given a version number X.Y.Z (for example, 2.6.0), Unity exposes three global #define directives in the following formats: UNITY_X, UNITY_X_Y and UNITY_X_Y_Z.
Here is an example of #define directives exposed in Unity 5.0.1:
| UNITY_5 | Определение платформы для мажор-версии Unity 2.6. |
| UNITY_5_0 | Определение платформы для мажор-версии Unity 3.0. |
| UNITY_5_0_1 | Определение платформы для мажор-версии Unity 3.0. |
You can compile code selectively based on the earliest version of Unity required to compile or execute a given portion of code. Given the same version format as above (X.Y.Z), Unity exposes one global #define directive that can be used for this purpose, in the format UNITY_X_Y_OR_NEWER.
The supported #define directives are:
| UNITY_5_3_OR_NEWER | Определение платформы для мажор-версии Unity 4.0. |
You can also compile code selectively depending on the scripting back-end.
You can also use the DEVELOPMENT_BUILD #define directive to identify whether your script is running in a player which was built with the “Development Build” option enabled.
Тестирование прекомпилированного кода.
Мы собираемся показать небольшой пример, как использовать прекомпилированный код. В данном примере просто выводится сообщение в зависимости от платформы, которую вы выбрали в качестве целевой для сборки.
 Окно Build Settings с выбором WebPlayer’а в качестве целевой платформы.
Создайте скрипт и скопируйте этот код:-
В дополнение к основной #if директиве компилятора, вы также можете использовать многооборотную проверку в C# и JavaScript:-
Пользовательские определения платформ
Кроме того, можно добавить определённые вами определения к встроенному набору. На панели Other Settings настроек проигрывателя (Player Settings), вы увидите текстовое поле Scripting Define Symbols.
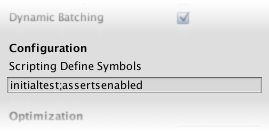
Здесь вы можете указать имена обозначений, которые хотите определить для конкретной платформы, через точку с запятой. Эти обозначения можно затем использовать в качестве условий для директив #if также как встроенные.
Глобальные пользовательские определения
Вы можете определить свои собственные директивы препроцессора, чтобы контролировать, какой код попадет в результат при компиляции. Для этого необходимо добавить текстовый файл с дополнительными директивами в папку “Assets/”. Имя файла зависит от языка, который вы используете, а расширение rsp.:
NOTE
Note that the .rsp file needs to match the compiler being invoked. For example:
#define directives
Platform #define directives
Unity’s Platform Dependent Compilation feature consists of some preprocessor directives that let you partition your scripts A piece of code that allows you to create your own Components, trigger game events, modify Component properties over time and respond to user input in any way you like. More info
See in Glossary to compile and execute a section of code exclusively for one of the supported platforms.
You can run this code within the Unity Editor, so you can compile the code specifically for your target platform and test it in the Editor.
The platform #define directives that Unity supports for your scripts are as follows:
Editor version #define directives
You can also compile code selectively. The options available depend on the version of the Editor that you are working on. Given a version number X.Y.Z (for example, 2.6.0), Unity exposes three global #define directives in the following formats: UNITY_X, UNITY_X_Y and UNITY_X_Y_Z.
Here is an example of #define directives exposed in Unity 5.0.1:
| Define | Function |
|---|---|
| UNITY_5 | #define directive for the release version of Unity 5, exposed in every 5.X.Y release. |
| UNITY_5_0 | #define directive for the major version of Unity 5.0, exposed in every 5.0.Z release. |
| UNITY_5_0_1 | #define directive for the minor version of Unity 5.0.1. |
Starting from Unity 5.3.4, you can compile code selectively based on the earliest version of Unity required to compile or execute a given portion of code. Given the same version format as above (X.Y.Z), Unity exposes one global #define in the format UNITY_X_Y_OR_NEWER, that can be used for this purpose.
Other #define directives
The supported #define directives are:
You use the DEVELOPMENT_BUILD #define to identify whether your script is running in a player which was built with the “ Development Build A development build includes debug symbols and enables the Profiler. More info
See in Glossary ” option enabled.
You can also compile code selectively depending on the scripting back-end.
Testing precompiled code
Below is an example of how to use the precompiled code. It prints a message that depends on the platform you have selected for your target build.
First of all, select the platform you want to test your code against by going to File > Build Settings. This displays the Build Settings window; select your target platform from here.
 Build Settings window with PC, Mac & Linux selected as the target platforms
Select the platform you want to test your precompiled code against and click Switch Platform to tell Unity which platform you are targeting.
Create a script and copy/paste the following code:
In C# you can use a CONDITIONAL attribute which is a more clean, less error-prone way of stripping out functions. See ConditionalAttribute Class for more information. Note that common Unity callbacks (ex. Start(), Update(), LateUpdate(), FixedUpdate(), Awake()) are not affected by this attribute because they are called directly from the engine and, for performance reasons, it does not take them into account.
In addition to the basic #if compiler directive, you can also use a multiway test in C#:
Platform custom #defines
It is also possible to add to the built-in selection of #define directives by supplying your own. Open the Other Settings panel of the Player settings and navigate to the Scripting Define Symbols text box.
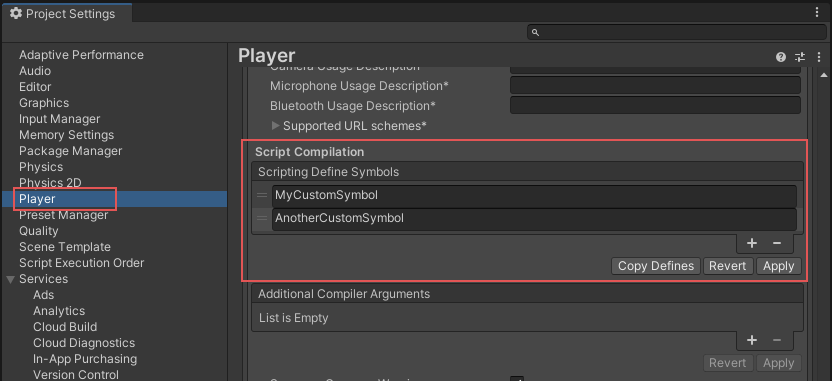
Enter the names of the symbols you want to define for that particular platform, separated by semicolons. These symbols can then be used as the conditions for #if directives, just like the built-in ones.
Global custom #defines
You can define your own preprocessor directives to control which code gets included when compiling. To do this you must add a text file with the extra directives to the Assets Any media or data that can be used in your game or project. An asset may come from a file created outside of Unity, such as a 3D Model, an audio file or an image. You can also create some asset types in Unity, such as an Animator Controller, an Audio Mixer or a Render Texture. More info
See in Glossary folder. The name of the file depends on the language you are using. The extension is .rsp:
| C# (player and editor scripts) |
