Body Transform
The Body Transform and Orientation are stored in the Animation Clip (using the Muscle definitions set up in the Avatar). They are the only world-space curves stored in the Animation Clip. Everything else: muscle curves and IK goals (Hands and Feet) are stored relative to the body transform.
Root Transform
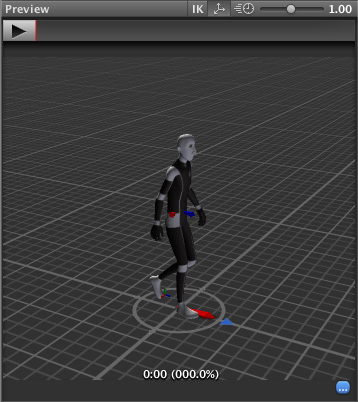
The Root Transform is a projection on the Y plane of the Body Transform and is computed at runtime. At every frame, a change in the Root Transform is computed. This change in transform is then applied to the Game Object to make it move.
 The circle below the character represents the root transform
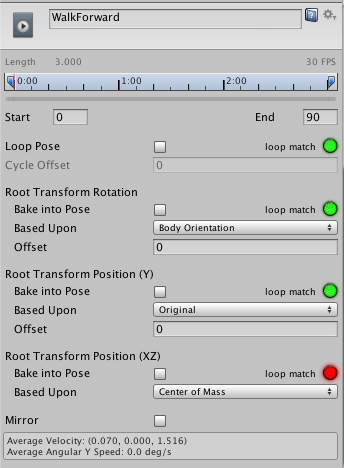
Инспектор анимационного клипа

Вращение Root Transform
Bake into Pose: The orientation will stay on the body transform (or Pose). The Root Orientation will be constant and delta Orientation will be identity. This means that the Game Object will not be rotated at all by that AnimationClip.
Only AnimationClips that have similar start and stop Root Orientation should use this option. You will have a Green Light in the UI telling you that an AnimationClip is a good candidate. A suitable candidate would be a straight walk or a run.
Based Upon: This lets you set the orientation of the clip. Using Body Orientation, the clip will be oriented to follow the forward vector of body. This default setting works well for most Motion Capture (Mocap) data like walks, runs, and jumps, but it will fail with motion like strafing where the motion is perpendicular to the body’s forward vector. In those cases you can manually adjust the orientation using the Offset setting. Finally you have Original that will automatically add the authored offset found in the imported clip. It is usually used with Keyframed data to respect orientation that was set by the artist.
Offset: used to enter the offset when that option is chosen for Based Upon.
Root Transform Position (Y)
This uses the same concepts described in Root Transform Rotation.
Bake Into Pose: The Y component of the motion will stay on the Body Transform (Pose). The Y component of the Root Transform will be constant and Delta Root Position Y will be 0. This means that this clip won’t change the Game Object Height. Again you have a Green Light telling you that a clip is a good candidate for baking Y motion into pose.
Most of the AnimationClips will enable this setting. Only clips that will change the GameObject height should have this turned off, like jump up or down.
Based Upon: In a similar way to Root Transform Rotation you can choose from Original or Mass Center (Body). There is also a Feet option that is very convenient for AnimationClips that change height (Bake Into Pose disabled). When using Feet the Root Transform Position Y will match the lowest foot Y for all frames. Thus the blending point always remains around the feet which prevents floating problem when blending or transitioning.
Offset: In a similar way to Root Transform Rotation, you can manually adjust the AnimationClip height using the Offset setting.
Root Transform Position (XZ)
Again, this uses same concepts described in Root Transform Rotation and Root Motion Position (Y).
Bake Into Pose will usually be used for “Idles” where you want to force the delta Position (XZ) to be 0. It will stop the accumulation of small deltas drifting after many evaluations. It can also be used for a Keyframed clip with Based Upon Original to force an authored position that was set by the artist.
Loop Pose
Loop Pose (like Pose Blending in Blend Trees or Transitions) happens in the referential of Root Transform. Once the Root Transform is computed, the Pose becomes relative to it. The relative Pose difference between Start and Stop frame is computed and distributed over the range of the clip from 0–100%.
Generic Root Motion and Loop Pose
This works in essentially the same as Humanoid Root Motion, but instead of using the Body Transform to compute/project a Root Transform, the transform set in Root Node is used. The Pose (all the bones which transform below the Root Motion bone) is made relative to the Root Transform.
Body Transform
The Body Transform and Orientation are stored in the Animation Clip Animation data that can be used for animated characters or simple animations. It is a simple “unit” piece of motion, such as (one specific instance of) “Idle”, “Walk” or “Run”. More info
See in Glossary (using the Muscle definitions This allows you to have more intuitive control over the character’s skeleton. When an Avatar is in place, the Animation system works in muscle space, which is more intuitive than bone space. More info
See in Glossary set up in the Avatar). They are the only world-space curves stored in the Animation Clip. Everything else: muscle curves and IK goals (Hands and Feet) are stored relative to the body transform.
Root Transform
The Root Transform is a projection on the Y plane of the Body Transform and is computed at runtime. At every frame, a change in the Root Transform is computed. This change in transform is then applied to the Game Object to make it move.
 The circle below the character represents the root transform
Animation Clip Inspector

Root Transform Rotation
Bake into Pose: The orientation will stay on the body transform (or Pose). The Root Orientation will be constant and delta Orientation will be identity. This means that the Game Object will not be rotated at all by that AnimationClip.
Only AnimationClips that have similar start and stop Root Orientation should use this option. You will have a Green Light in the UI (User Interface) Allows a user to interact with your application. More info
See in Glossary telling you that an AnimationClip is a good candidate. A suitable candidate would be a straight walk or a run.
Based Upon: This lets you set the orientation of the clip. Using Body Orientation, the clip will be oriented to follow the forward vector of body. This default setting works well for most Motion Capture (Mocap) data like walks, runs, and jumps, but it will fail with motion like strafing where the motion is perpendicular to the body’s forward vector. In those cases you can manually adjust the orientation using the Offset setting. Finally you have Original that will automatically add the authored offset found in the imported clip. It is usually used with Keyframed data to respect orientation that was set by the artist.
Offset: used to enter the offset when that option is chosen for Based Upon.
Root Transform Position (Y)
This uses the same concepts described in Root Transform Rotation.
Bake Into Pose: The Y component of the motion will stay on the Body Transform (Pose). The Y component of the Root Transform will be constant and Delta Root Position Y will be 0. This means that this clip won’t change the Game Object Height. Again you have a Green Light telling you that a clip is a good candidate for baking Y motion into pose.
Most of the AnimationClips will enable this setting. Only clips that will change the GameObject The fundamental object in Unity scenes, which can represent characters, props, scenery, cameras, waypoints, and more. A GameObject’s functionality is defined by the Components attached to it. More info
See in Glossary height should have this turned off, like jump up or down.
Based Upon: In a similar way to Root Transform Rotation you can choose from Original or Mass Center (Body). There is also a Feet option that is very convenient for AnimationClips that change height (Bake Into Pose disabled). When using Feet the Root Transform Position Y will match the lowest foot Y for all frames. Thus the blending point always remains around the feet which prevents floating problem when blending or transitioning.
Offset: In a similar way to Root Transform Rotation, you can manually adjust the AnimationClip height using the Offset setting.
Root Transform Position (XZ)
Again, this uses same concepts described in Root Transform Rotation and Root Motion Position (Y).
Bake Into Pose will usually be used for “Idles” where you want to force the delta Position (XZ) to be 0. It will stop the accumulation of small deltas drifting after many evaluations. It can also be used for a Keyframed clip with Based Upon Original to force an authored position that was set by the artist.
Loop Pose
Loop Pose (like Pose Blending in Blend Trees or Transitions) happens in the referential of Root Transform. Once the Root Transform is computed, the Pose becomes relative to it. The relative Pose difference between Start and Stop frame is computed and distributed over the range of the clip from 0–100%.
Generic Root Motion and Loop Pose
This works in essentially the same as Humanoid Root Motion, but instead of using the Body Transform to compute/project a Root Transform, the transform set in Root Node A transform in an animation hierarchy that allows Unity to establish consistency between Animation clips for a generic model. It also enables Unity to properly blend between Animations that have not been authored “in place” (that is, where the whole Model moves its world position while animating). More info
See in Glossary is used. The Pose (all the bones which transform below the Root Motion bone) is made relative to the Root Transform.
Body Transform
The Body Transform and Orientation are stored in the Animation Clip Animation data that can be used for animated characters or simple animations. It is a simple “unit” piece of motion, such as (one specific instance of) “Idle”, “Walk” or “Run”. More info
See in Glossary (using the Muscle definitions This allows you to have more intuitive control over the character’s skeleton. When an Avatar is in place, the Animation system works in muscle space, which is more intuitive than bone space. More info
See in Glossary set up in the Avatar). They are the only world-space curves stored in the Animation Clip. Everything else: muscle curves and IK goals (Hands and Feet) are stored relative to the body transform.
Root Transform
The Root Transform is a projection on the Y plane of the Body Transform and is computed at runtime. At every frame, a change in the Root Transform is computed. This change in transform is then applied to the Game Object to make it move.
 The circle below the character represents the root transform
Animation Clip Inspector
Root Transform Rotation
Bake into Pose: The orientation will stay on the body transform (or Pose). The Root Orientation will be constant and delta Orientation will be identity. This means that the Game Object will not be rotated at all by that AnimationClip.
Only AnimationClips that have similar start and stop Root Orientation should use this option. You will have a Green Light in the UI (User Interface) Allows a user to interact with your application. More info
See in Glossary telling you that an AnimationClip is a good candidate. A suitable candidate would be a straight walk or a run.
Based Upon: This lets you set the orientation of the clip. Using Body Orientation, the clip will be oriented to follow the forward vector of body. This default setting works well for most Motion Capture (Mocap) data like walks, runs, and jumps, but it will fail with motion like strafing where the motion is perpendicular to the body’s forward vector. In those cases you can manually adjust the orientation using the Offset setting. Finally you have Original that will automatically add the authored offset found in the imported clip. It is usually used with Keyframed data to respect orientation that was set by the artist.
Offset: used to enter the offset when that option is chosen for Based Upon.
Root Transform Position (Y)
This uses the same concepts described in Root Transform Rotation.
Bake Into Pose: The Y component of the motion will stay on the Body Transform (Pose). The Y component of the Root Transform will be constant and Delta Root Position Y will be 0. This means that this clip won’t change the Game Object Height. Again you have a Green Light telling you that a clip is a good candidate for baking Y motion into pose.
Most of the AnimationClips will enable this setting. Only clips that will change the GameObject The fundamental object in Unity scenes, which can represent characters, props, scenery, cameras, waypoints, and more. A GameObject’s functionality is defined by the Components attached to it. More info
See in Glossary height should have this turned off, like jump up or down.
Based Upon: In a similar way to Root Transform Rotation you can choose from Original or Mass Center (Body). There is also a Feet option that is very convenient for AnimationClips that change height (Bake Into Pose disabled). When using Feet the Root Transform Position Y will match the lowest foot Y for all frames. Thus the blending point always remains around the feet which prevents floating problem when blending or transitioning.
Offset: In a similar way to Root Transform Rotation, you can manually adjust the AnimationClip height using the Offset setting.
Root Transform Position (XZ)
Again, this uses same concepts described in Root Transform Rotation and Root Motion Position (Y).
Bake Into Pose will usually be used for “Idles” where you want to force the delta Position (XZ) to be 0. It will stop the accumulation of small deltas drifting after many evaluations. It can also be used for a Keyframed clip with Based Upon Original to force an authored position that was set by the artist.
Loop Pose
Loop Pose (like Pose Blending in Blend Trees or Transitions) happens in the referential of Root Transform. Once the Root Transform is computed, the Pose becomes relative to it. The relative Pose difference between Start and Stop frame is computed and distributed over the range of the clip from 0–100%.
Generic Root Motion and Loop Pose
This works in essentially the same as Humanoid Root Motion, but instead of using the Body Transform to compute/project a Root Transform, the transform set in Root Node A transform in an animation hierarchy that allows Unity to establish consistency between Animation clips for a generic model. It also enables Unity to properly blend between Animations that have not been authored “in place” (that is, where the whole Model moves its world position while animating). More info
See in Glossary is used. The Pose (all the bones which transform below the Root Motion bone) is made relative to the Root Transform.
Русские Блоги
1. Основные понятия
В анимации Unity3D положение и угол модели часто меняются. Нам нужно решить, использовать ли эти преобразования модели в анимации для реальной модели (GameObject).
В Untiy3D анимационные преобразования делятся на две категории:
1) Трансформация тела (поза: поза)
2) Root Transform ( траектория: траектория )
Мы можем установить, будут ли некоторые преобразования (перемещение, вращение и т. Д.) Модели в анимации принадлежать Трансформации тела (поза) или части Корневого преобразования (траектория).

1) Если [Применить корневое движение] не Выбрано: персонаж работает на месте, и значение в Transform не изменяется
2) Если [Применить корневое движение] Уже Выбрано: персонаж бежит по сцене, а значение в Transform следует за изменением
1.1 Трансформация тела (Поза: осанка)
Преобразование тела и ориентация сохраняются в анимационном клипе (с использованием определения мышц, установленного в аватаре). Это единственные кривые мирового пространства, хранящиеся в анимационных клипах. Все остальное: мышечные кривые и ИК цели (Руки и Ноги) хранятся относительно тела.
1.2 Root Transform( траектория: траектория Расчет в реальном времени)

Круг под символом представляет корневое преобразование (Root Transform)
1.3 Bake Into Pose ( Испечь как позу)
Bake Into Pose: То есть установить преобразование как часть преобразования тела (поза).
Если преобразование установлено как часть Body Transform (поза), вполне эквивалентно, что эти преобразования являются частью самой анимации, то есть, независимо от того, установлено или нет Apply Root Motion, в сцене мы увидим изменение положения модели или угла. Поскольку Body Transform не влияет на фактическое положение и угол наклона модели (GameObject), так что здесь приведен только эффект анимации, значения параметров положения и угла модели (GameObject) остаются неизменными.
1.4 Apply Root Motion
Роль Apply Root Motion заключается в следующем:
1) Решите, применять ли Root Transform:
2) После завершения анимации примените изменения в Body Transform к модели:
Это применяется только в конце, то есть когда анимация, положение (GameObject), вращение и другие параметры модели остаются неизменными, когда анимация заканчивается, она будет изменена перед началом новой анимации. Обратите внимание, что здесь то же самое, что упомянуто выше Корневая трансформация
2. Примеры
Возьмем анимацию ходьбы персонажа в качестве примера для анализа следующих ситуаций (здесь, в качестве примера, возьмем «Положение корневого преобразования (XZ)»)
1) Установите флажок [Выпекать в позе], снимите флажок [Применить корневое движение]
После выбора «Выпекать в позе» преобразование принадлежит «Преобразованию тела», поэтому, даже если здесь не установлен флажок «Применить корневое движение», анимация все равно будет отражаться в сцене, а персонажи будут следовать по пути анимации (но если мы наблюдаем модель в Инспекторе Преобразование, его значение не изменилось). Это связано с тем, что Apply Root Motion не установлен, поэтому преобразование не будет применено к модели после окончания анимации: в это время, если запускается новая анимация, модель мгновенно возвращается в исходное положение (когда начинается новая анимация, модель ходит). Положение в начале анимации).
2) Установите флажок [Выпекать в позе] и выберите [Применить корневое движение]
Единственное отличие здесь от вышеупомянутого состоит в том, что после завершения анимации преобразование будет применено к модели перед запуском новой анимации. (Преобразование модели изменится до начала новой анимации. Когда начинается новая анимация, модель находится в положении, где закончилась последняя анимация)
3) Снимите флажок [Выпекать в позе], отметьте [Применить корневое движение]
Преобразование здесь все еще принадлежит Root Transform, но поскольку Apply Root Motion не проверено, преобразование не будет применено, поэтому модель останется неизменной локально. Естественно, когда начинается новая анимация, модель находится в положении, где начинается анимация ходьбы.
3. Просмотрщик видеоклипов
Настройки редактора анимационных клипов (Root Transform Rotation, Root Transform Position (Y) и Root Transform Position (XZ)) позволяют вам управлять корнями из Body Transform Трансформация (Root Transform) проекция. На основании этих настроек некоторые части преобразования тела могут быть перенесены в преобразование корня.
Например, вы можете решить, хотите ли вы, чтобы позиция движения Y была частью корневого движения (дорожка) или части позы (трансформация тела), которая называется Bake in Pose. (Например, вы можете решить, хотите ли вы, чтобы позиция движения Y была частью корневого движения (траектория) или частью позы (трансформация тела), которая известна как Запеченная в позу.)

4. Корневая трансформация вращения
5. Положение корневого преобразования (Y)
6. Положение корневого преобразования (XZ)
Выпекать как позу (Bake Into Pose): Будет использоваться для бездействия, в этом случае вы хотите принудительно установить инкрементную позицию (XZ) в 0. После нескольких оценок он перестанет накапливать постепенные изменения. Он также может использоваться для создания клипов ключевых кадров на основе (на основе) исходного направления (оригинал) для принудительного изменения разрешенного местоположения настроек исполнителя.
Selecting a Root Motion Node
When root motion is contained within an imported animation clip, that motion will be used to drive the movement and rotation of the GameObject that is playing the animation. Sometimes however it may be necessary to manually select a different specific node within the hierarchy of your animation file to act as the root motion node.
(example use case required here)
The Motion field within the Animation import settings allows you to use a hierarchical popup menu to select any node (Transform) within the hierarchy of the imported animation and use it as the root motion source. That object’s animated position and rotation will control the animated position and rotation of the GameObject playing back the animation.
To select a root motion node for an animation, first select the imported animation file in your project view, then in the import settings in the inspector, select the Animations button.
 View the Animations section of the Import Settings for your animation file
Then scroll all the way to the bottom of the inspector to find the Motion heading, among the four fold-out headings as shown:
 The Motion fold-out heading, along with the Mask, Curves, and Events headings
 Traversing the hierarchy of objects to select a root motion node
Once the Root motion node has been selected, the object’s motion will now be driven by the animation from that particular object.