Remesh
Использование Remesh во вьюпорте.
Preserve (Сохранить):
Так же Remesh сшивает объекты вместе.
Сшивание объектов через Remesh
Quad Remesh
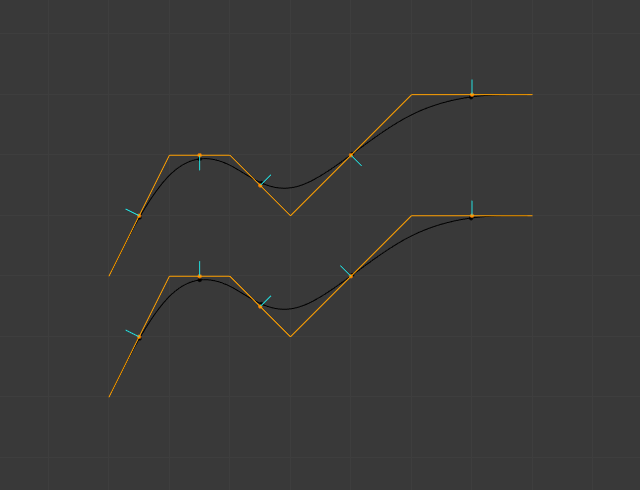
Quad remesh использует алгоритм Quadriflow для создания сетки на основе Quad с несколькими полюсами и краевыми петлями, соответствующими кривизне поверхности. Этот метод относительно медленный, но дает более качественный результат для окончательной топологии.
При нажатии на кнопку появляется меню.
Настройки Quad Remesh
Использование Quad Remesh (Оригинал)
Dyntopo
Изменение сетки при включении Dyntopo
При включении Dyntopo появится предупреждение, если есть настраиваемые данные (модификаторы, UV-развертка, vertex paint).
Предупреждение при включении Dyntopo
Использование Detail Size
Refine Method (Метод изменении топологии):
Использование кисти Simplify.
Multiresolution
Включение Optimal Display
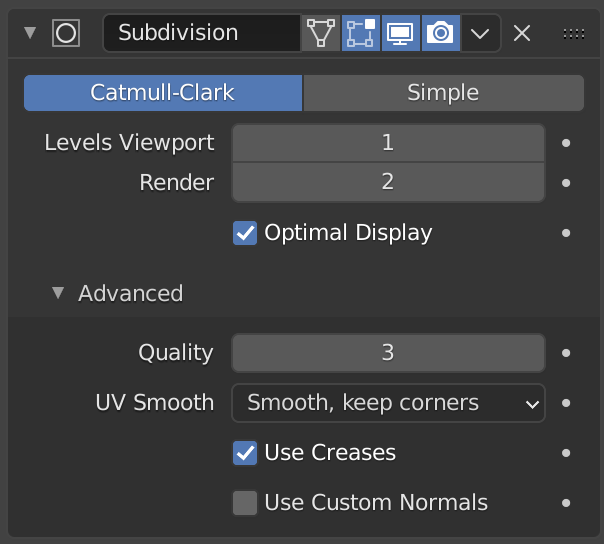
Subdivisions (Подразделить):
Пример использования Unsubdivide
Shape (Форма):
Сначала выберите объект с соответствующей топологией, затем объект с Multires, на котором вы хотите изменить форму, и нажмите Reshape. На сложных объектах может вызывать артефакты.
Generate:
Применение Rebild Subdivisions
Advanced (Продвинутые):
Subdivision Type: Тип подразделения Catmull-Clark или Simple.
UV Smooth (Сглаживание UV):
Boundary Smooth (Граница сглаживания) (в 2.91):
Приёмы работы в Blender. Часть 1
Вопросы ставившие меня в тупик когда я начинал осваивать Blender.
Перенос центра трансформации
Нужно, чтобы дверь поворачивалась вокруг петель, а не вокруг центра двери. Петли условно сейчас находятся на ребре. Переносим 3D курсор точно на центр ребра: Shift+S (Snap)> Cursor to Selected. Потом даём команду перенести центр трансформации в 3D курсор.

Не пропорциональные результаты скруглений и модификаторов
Нужно скруглить рёбра крышки стола. В режиме редактирования объекта (кнопка Tab) выбираем сразу все необходимые рёбра и давим Ctrl+B (Bevel). Проблема — скругление происходит не одинаково на всех гранях:

Так работает скругление потому, что размер объекта в процентах не равен 100%:

Сейчас с точки зрения блендера крышка стола — это растянутый куб, и все деформации рассчитываются тоже растянутыми. В этом есть смысл. Объекты могут менять размеры не пропорционально во время анимации, и все модификаторы должны так же менять размеры. Решение: нужно сказать блендеру, что текущие размеры — это и есть 100%. В обычном режиме давим Ctrl+A (Apply). Выбираем здесь Scale:
Ctrl+B (Bevel), должно получиться так:

Это также влияет на результаты модификаторов. Лично я уже рефлекторно нажимаю Ctrl+A (Apply) → Scale.
Сброс координат положения, вращения, размера
Вы создали объект, а он создался далеко, там где был 3D курсор, и его не видно и не понятно где он.
Ходовые кнопки
Помните: важно, над каким окном находится указатель мыши. Не торопитесь.
Как выровнять грань?
Конкретно речь идёт о подобной операции:

Нужно уменьшить размер группы точек до нуля по какой-либо оси. Команды можно вводить, последовательно нажимая кнопки. В данном случае давим последовательно S, Z, 0 (ноль) В левом нижнем углу рабочего 3D окна будет вот такая надпись:

А в самом окне будет так:

«Вперёд» — это ось Y
Старайтесь фронтальное направление предмета делать по глобальной и локальной оси Y. В некоторых модификаторах и игровом движке это направление принято за направление «вперёд» и не везде его можно изменить на другую ось.
Модификаторы Subdivision Surface и Multiresolution – в чём разница?
Subdivision Surface — это сглаженные поверхности. Multiresolution — это сглаженные поверхности с возможностью скульптинга поверх. С помощью Subdivision Surface удобно делать основную форму дивана. Потом поменять его на Multiresolution и кисточкой вылепить складки ткани.
Линкованые обьекты
Интерьер. Не надо делать все предметы в одном файле. Не удобно. Создавайте утюг отдельным файлом, стул другим файлом, комнату в третьем файле — главном.
Blender Subdivision Surface Modifier Tutorial [2021]
This Blender Subdivision Surface Modifier Tutorial explains how to apply more details to your 3D models step by step. Subdivision is an easy way to add more geometry and details to your objects. This tool is widely used in 3D modeling of mane kinds. Especially you can find it useful when working with high-poly and even realistic scenes. Today we are looking at the SubSurf Modifier in Blender v2.92. It also should work with newer and older versions too.
What is Subdivision?
Subdivision lets you increase the geometry count of any object, so it can be used later. The simplest way to use subdivision is to select an object and go into the Edit mode. Then right-click on the object and select Subdivide.
Right away you should see the change in the object – new geometry in the form of edge loops should appear.
And you can also use the menu on the bottom left of the viewport to control the Subdivide function. Increase the number of cuts, their smoothness, and more here.
Just like this, you can add more geometry to the object. Now we can use all these new vertices to create something out of them.
Blender Subdivision Surface Modifier
Regular subdivision is good, but the main thing that we are going to talk about today is Subdivision Surface Modifier. As with any other modifier – it can be found in the Modifier Properties of the Properties Editor.
This modifier is supposed to subdivide the whole object and thus make it much smoother. Subdivision Surface is also called SubSurf modifier for short. Adding it to the default cube looks like this:
It definitely became smooth, but because of this it was distorted and does not even look like a cube any more. Let’s see if we can do something with this using the appeared modifier settings in the Properties Editor.
Blender Subdivision Levels
The Levels Viewport and Render control how much subdivision does the modifier add. Higher numbers mean that it will be even more smoothed out. Here is how our “cube” looks with higher levels:
It is even less of a cube now, it is practically a sphere already. But if we apply the Subdivision modifier – we can see how exactly did geometry change. To do this – click on the arrow in the modifier settings and then “Apply”.
After that, we can go into the Edit Mode and look at the geometry. I have added a proper sphere object on the right, so we could compare them one to another.
It is seen that they are very different, but it can’t be said that any of them are superior. Some people prefer to subdivide a cube a bunch of times to use it as a sphere. But the geometry is a bit uneven after doing it like this. Some places have more vertices, while others have less. These clusters are where original cube vertices have been. In fact, the original cube is still there. We can easily prove that by selecting original edges and see that they are there.
Subdivision Type
Returning to the settings and what could we do to make it better. Changing levels definitely was not the right move as it made things worse. Another thing that we can try is to change the Type of Subdivision. By default, it is set to Catmull-Clark and we can change it to only one another option – Simple.
Doing this changes the scene drastically. The cube is back and it looks exactly the same as it did before adding any modifiers to it.
Though after applying the modifier it appears that it is not the same and has been subdivided.
The changes just not so drastic, the cube did not get smoothed out. Additional geometry just was added on top. In other words, a Simple type of SubSurf modifier is the same thing as manually subdividing an object. Just like we did at the beginning of the article.
How to Properly Use Blender Subdivision Surface Modifier
After the previous examples, you may think that the Subdivision Surface is not that great. After all, it distorted the cube and it became a sphere. Alternatively, we could use a simple subdivide, but this variant did not smooth the cube at all.
Worry not, because SubSurf is a much better modifier than it seems. It just requires some knowledge to properly handle it and use it on the right objects. Just look at the Suzanne monkey before and after applying Subdivision Surface to it. No additional changes made.
So some objects just work with the modifier flawlessly, while other examples don’t. But if we know how – we can work on the objects that can’t and fix the problems.
Ways to Fix Distorted Object
As an example – I have added a regular cylinder mesh to the scene and applied the Subsurface Modifier to it. This made the object really smoothed and distorted. We will look at what can be done to fix this problem and improve the mesh.
To fix this problem, we will change the geometry of the object a bit to “tighten” it, because it gets too smoothed out. There are multiple ways of doing so, but this does not mean that all of them work in every situation. It all depends on your scene, some will work in one situation, other methods will in another situation.
Loop Cuts
Probably the most famous and used method of tightening the geometry is adding loop cuts. This can be done in the Edge menu > Loop Cut and Slide.
Alternatively, you can use the [Ctrl+R] keyboard shortcut. Add a loop-cut to the side of the object that you want to tighten and then move it very close to the already existing edge loop. You should see geometry changing in real-time.
Though be careful not to overlap the added edge loop with the existing one. After that, I have done the same thing with the bottom part of the object
It already looks a lot better, but still not ideal. Seems that loop cuts are not the best variant for the cylinder object. Resetting everything and going to the next method.
Bevels
Adding bevels to an edge is very similar to adding loop cuts on both sides of it. But this method is a bit more convenient, than using two loop cuts. Though can’t be used if you need to “tighten” only one of the sides. To use it – select the needed edge loop and go to Edit > Bevel Edges or [Ctrl+B]
Then use Bevel Settings to set segments to 3 and set the suitable width:
Doing this to both the top and bottom sides yields a really good result. This looks exactly as you would want it to look – a bit smoothed-out cylinder.
Edge Crease
Last but not least method for this article – Edge Crease. It is a very similar thing to adding a bevel to the object, but without really adding any new geometry. You just need to indicate which edges of the object should not be smoothed out by the SubSurf modifier.
Option to use this tool, same as for the last two, found in the Edge menu. The alternative is to use the [Shift+E] shortcut.
In the case of our cylinder – edge crease does not work that well. Mainly this happened because the top and bottom of this cylinder are n-gons. And it can be difficult to work with one.
Seems that in the case of this cylinder – it would be best to use the bevel method, as both edge crease and loop cut methods had some problems with them.
Blender Subdivision Surface Modifier Settings
We already looked at the main settings regarding the Subdivision Surface Modifier, but this time let’s take a deeper look at what we can do with each of the options here.
Objects with and without Limist Surface turned on.
The left object has Use Crease on, the right object is off
Example of Blender Subdivision Surface Modifier in Use
How about a small example to show you how the Subdivision Surface is used on real models? I have created this simple low-poly pirate hat.
But what if I want to make it high-poly instead? For this, I will use a Subdivision Surface Modifier.
It definitely did smooth out the hat a lot. But now it is too smooth. All of the edges are now smooth and especially the place, where there was a crack now looks odd and weird.
I will use the Loop Cut method on this object. As I said, usually it is the most used one and the most universal. Started by adding two loop cuts near the middle to fix the crack shape.
To improve the top part of the hat – also added some loop cuts there.
The ends of the hat still looked weird, they were very flat after being smoothed. So one more loop cut there, to help with the shape.
And finally added the last loop cut at the bottom of the object, to tighten it there.
After a little bit of work, we have a high-poly model of a pirate hat. Making it out of the low-poly one was a lot simpler, than trying to model something like this myself.
Conclusion – Blender Subdivision Surface Modifier Tutorial
Subdivision Surface Modifier is one of the strongest tools out there if you plan to create a high-poly model. Allows you to use a low-poly object as a foundation to create something realistic. Though sometimes using it can be confusing and difficult, it all comes with the experience and after some tries, you should be able to do everything yourself. Checkout also our other Blender Tutorials and Top 3D Model Reviews.
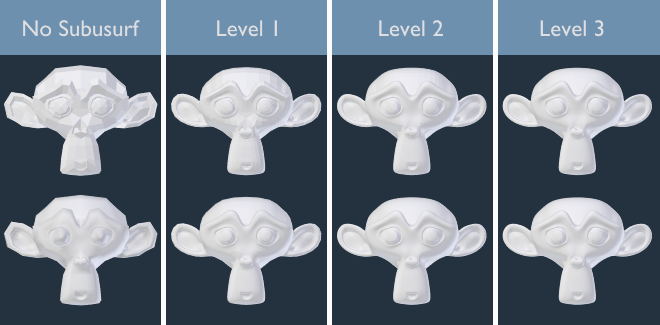
Subdivision Surface

Уровни подразделения от 0 до 3, без и с Smooth Shading
Совет
Модификатор Subdivision Surface не позволяет вам редактировать новую подразделенную геометрию, не применяя модификатор, но модификатор Multiresolution позволяет (в режиме скульптинга (Sculpt Mode)).
Примечание
Этот модификатор сейчас использует OpenSubdiv библиотеку как процессор для окончательной обработки данных.
Настройки

Предупреждение
Высокие уровни подразделений приводят к увеличению количества вершин, что значит, что больше памяти будет потребляться (ОЗУ и видео памяти для отображения). Потенциально Blender может вылететь или зависнуть если у вас нет достаточно доступной памяти.
Совет
Будьте осторожны, не устанавливайте Viewport подразделения выше, чем Render подразделения, это будет означать, что в 3D Viewport качество будет выше, чем на рендере.
Горячие клавиши
Чтобы быстро добавить Subdivision Surface модификатор к одному или нескольким объектам, выберите объект (объекты) и нажмите Ctrl-1. Это добавит Subdivision Surface модификатор со значением подразделений Viewport равным 1. Вы можете использовать и другие числа тоже, такие как Ctrl-2, Ctrl-3, и т. д., чтобы добавить модификатор с соответствующим числом подразделений. Добавление Subdivision Surface модификатора этим способом не будет модифицировать Render подразделения.
Если объект уже имеет Subdivision Surface модификатор, использование этого способа будет изменять уровень подразделения вместо добавления дополнительного модификатора.
Управление
Catmull-Clark подразделение закругляет ребра, и часто это не то чего вы хотите. Есть несколько решений, которые позволят вам контролировать подразделение.
Weighted Edge Creases
Взвешенные складки ребер для подразделения поверхности позволяют вам изменять путь, которым Subdivision Surface модификатор подразделяет геометрию, придавая ребрам сглаженности или остроты.

Подразделенный куб с установленными складками на ребрах.
Вес складки выбранных ребер может быть изменен в панели Transform. Похожий на инструмент масштабирования, Shift-E может также быть использован для регулирования веса складки. Увеличение значения делает ребро “сильнее” и более сопротивляющееся эффекту сглаживания подразделения поверхностей.
Edge Loops

Уровень сглаживания куба равный 2, тот же куб с дополнительным Edge Loop, и тот же куб с шестью дополнительными Edge Loops.
Subdivision Surface модификатор показывает почему хорошая, чистая топология настолько важна. Как вы можете видеть на изображении, это имеет сильный эффект на стандартный куб. Прежде чем вы добавите дополнительные петли (с помощью, например, Loop Cut и Slide) форма будет почти не узнаваема как куб.
Меш с заранее обдуманной топологией имеет правильное расположение петель ребер, что позволяет устанавливать больше петель (или удалять их) для контроля остроты/сглаженности результирующего меша.
Известные ограничения
Non-Contiguous Normals
Система подразделения Blender создает прекрасные сглаженные подразделенные меши, но любая подразделенная грань (т.е., любая маленькая грань, созданная алгоритмом из одиночной грани исходного меша), принимает общую ориентацию нормалей данной исходный грани.


Вид сбоку изображения слева.
Резкое изменение нормали может создавать неприятные черные выемки даже если эти вывернутые нормали не являются проблемой для модели как таковой.
Быстрый способ исправить это, использовать Recalculate Normals операцию в режиме редактирования.
Если у вас все еще есть немного неприятных черных выемок вам нужно будет самостоятельно вывернуть нормали.
Subdivision Surface Modifier
The Subdivision Surface modifier (often shorten to “Subdiv”) is used to split the faces of a mesh into smaller faces, giving it a smooth appearance. It enables you to create complex smooth surfaces while modeling simple, low-vertex meshes. It avoids the need to save and maintain huge amounts of data, and gives a smooth “organic” look to the object.
As with any modifier, order of execution (position in the modifier stack ) has an important bearing on the results.
Subdivision levels 0 to 3, without and with Smooth Shading. В
The Subdivision Surface modifier does not allow you to edit the new subdivided geometry without applying it, but the Multiresolution modifier does (in Sculpt Mode).
This modifier uses the OpenSubdiv library as a backend.
Options
The Subdivision Surface modifier. В
The default option, subdivides and smooths the surfaces. According to its Wikipedia page, the “arbitrary-looking formula was chosen by Catmull and Clark based on the aesthetic appearance of the resulting surfaces rather than on a mathematical derivation.”
Only subdivides the surfaces, without any smoothing (the same as the Subdivide operator, in Edit Mode). Can be used, for example, to increase base mesh resolution when using displacement maps.
Levels Viewport, Render
The number of subdivision levels shown in the 3D Viewport or the final render.
Higher levels of subdivisions results in more vertices, which means higher memory consumption (both system RAM, and video memory for display). This can cause Blender to hang or crash if not enough memory is available.
The right combination of these settings will allow you to keep a fast and lightweight approximation of your model when interacting with it in the 3D Viewport, but use a higher quality version when rendering.
Be careful not to set the Viewport subdivisions higher than the Render subdivisions, this would mean that the quality in the 3D Viewport will be higher than the rendered.
When rendering the wireframe of this object, the wires of the new subdivided edges will be skipped (only displays the edges of the original geometry).
Advanced
Places vertices at the surface that would be produced with infinite levels of subdivision (smoothest possible shape).
When Use Limit Surface is enabled this property controls how precisely vertices are positioned on the limit surface (relatively to their theoretical position of an infinitely subdivided mesh). It can be lowered to get a better performance.
Using higher values does not necessarily mean real improvement in quality, ideal results might be reached well before the maximum Quality value.
This value can affect the accuracy of Edge Creases ; using a higher Quality value will allow for a wider range of crease values to work accurately.
Controls how subdivision smoothing is applied to UVs.
UVs remain unchanged.
UV islands are smoothed, but their boundary remain unchanged.
Keep Corners, Junctions
UVs are smoothed, corners on discontinuous boundary and junctions of three or more regions are kept sharp.
Keep Corners, Junctions, Concave
UVs are smoothed, corners on discontinuous boundary, junctions of three or more regions and darts and concave corners are kept sharp.
UVs are smoothed, boundaries are kept sharp.
UVs and their boundaries are smoothed.
Controls how open boundaries (and corners) are smoothed.
Smooth boundaries, including corners.
Smooth boundaries, but corners are kept sharp.
Use the Weighted Edge Creases values stored in edges to control how smooth they are made.
Use Custom Normals
Interpolates existing Custom Split Normals of the resulting mesh.
Keyboard Shortcuts
If an object already has a Subdivision Surface modifier, doing this will simply change its subdivision level instead of adding another modifier.
Control
Catmull-Clark subdivision rounds off edges, and often this is not what you want. There are several solutions that allow you to control the subdivision.
Weighted Edge Creases
Weighted edge creases for subdivision surfaces allows you to change the way the Subdivision Surface modifier subdivides the geometry to give the edges a smooth or sharp appearance.
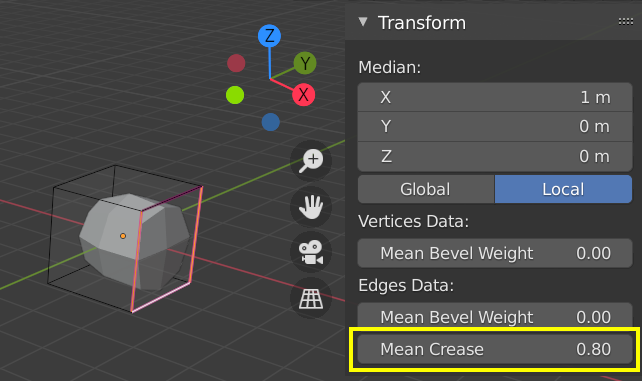
A subdivided cube with creased edges. В
Edge Loops
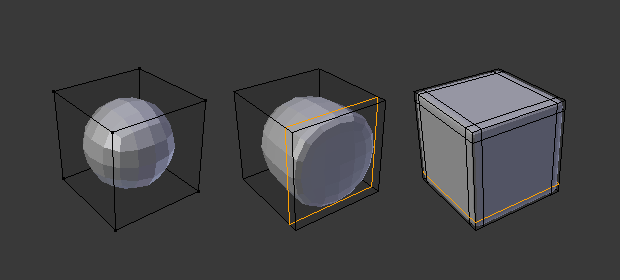
Subdivision Level 2 cube, the same with an extra Edge Loop, and the same with six extra Edge Loops. В
The Subdivision Surface modifier demonstrates why good, clean topology is so important. As you can see in the figure, it has a drastic effect on a default cube. Until you add in additional loops (with e.g. Loop Cut and Slide ), the shape is almost unrecognizable as a cube.
A mesh with deliberate topology has good placement of edge loops, which allow the placement of more loops (or their removal) to control the sharpness/smoothness of the resultant mesh.
Known Limitations
Non-Contiguous Normals
Blender’s subdivision system produces nice smooth subdivided meshes, but any subdivided face (that is, any small face created by the algorithm from a single face of the original mesh), shares the overall normal orientation of that original face.

Comparison of good normals and bad normals. В
Side view of image on the left. В
Abrupt normal changes can produce ugly black gouges even though these flipped normals are not an issue for the shape itself.
A quick way to fix this is to use Blender’s Recalculate Normals operation in Edit Mode.
© Copyright : This page is licensed under a CC-BY-SA 4.0 Int. License. Last updated on 11/24/2021.