Config APK – что за программа, как работает
Все чаще владельцы современных смартфонов находят там неизвестные приложения, причем, становится таких программ в Андроиде все больше и больше. Отсюда и берутся постоянные вопросы о предназначении тех или иных софтин.
В статье мы расскажем о программке Config APK, которая часто встречается на устройствах Samsung, Huawei, HTC и многих других. Вы поймете что это за приложение, как оно работает и можно ли его удалять.

Программа Config APK часто встречается в Samsung
Что это за приложение?
Config APK или configAPK – является частью названия пакета android.autoinstalls.config и отвечает за настройку приложений при первой загрузке устройства. Таким образом, это необходимый компонент, и его не следует трогать. Наиболее часто программка встречается в Самсунгах.
Сам по себе, конфигапк является исполняемым файлом и работает в фоне. Связан он с процедурой автоматической установки и первоначальной настройки системных программ при первом включении аппарата.
В случае сброса устройства и последующего восстановления, это приложение снова будет выполнять первоначальную надстройку в Андроиде. Файл весит очень мало (
20 КБ), но хранит достаточно важные конфигурации.
Нужно ли удалять Config APK?
Ответ на этот вопрос однозначен – удалять эту программку не следует. Производитель не зря добавил эту небольшую службу, так как она выполняет важную роль в момент первого включения или понадобится вам в случае последующих сбросов устройства. Все что вы можете сделать – отключить его.
Некоторые отзывы в Сети утверждают, что программка нагружает их телефон и заметно нагревает его. Конечно же, ConfigAPK работает в фоне, но минимально (как это только возможно) влияет на нагрузку процессора. Поэтому, если вы наткнулись на эту программку в поисках «Что бы удалить, так как телефон виснет?» – вам лучше исследовать и искать проблему в другом месте.
Drupal Русскоязычное сообщество
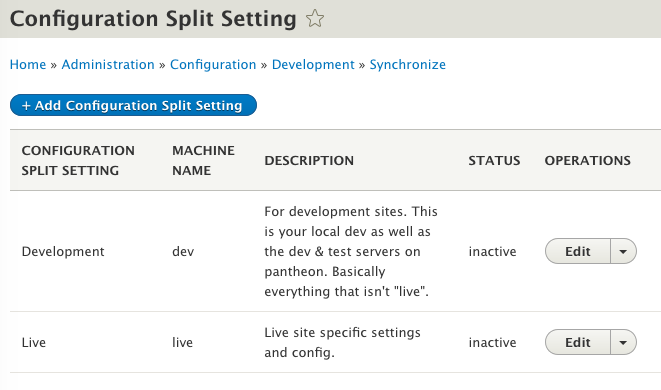
Очень часто доступы к 3rd party сервисам должны быть различными на dev и live инстансами. Для того чтобы это сделать с помощью конфигов, нужно использовать модуль Configuration Split:
/admin/config/development/configuration/config-split 
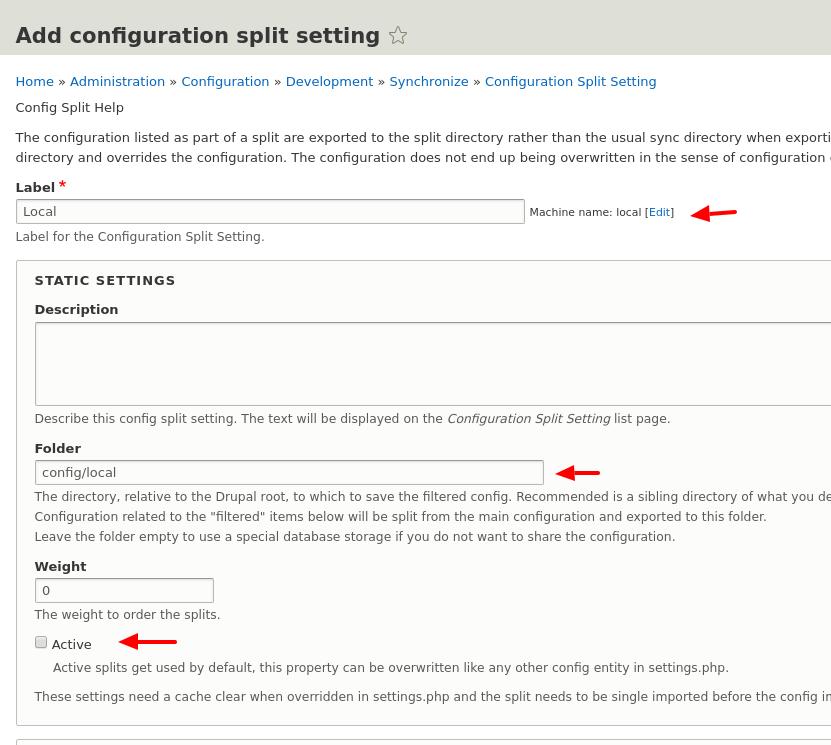
Теперь добавим split settings для local, dev, live инстансов.
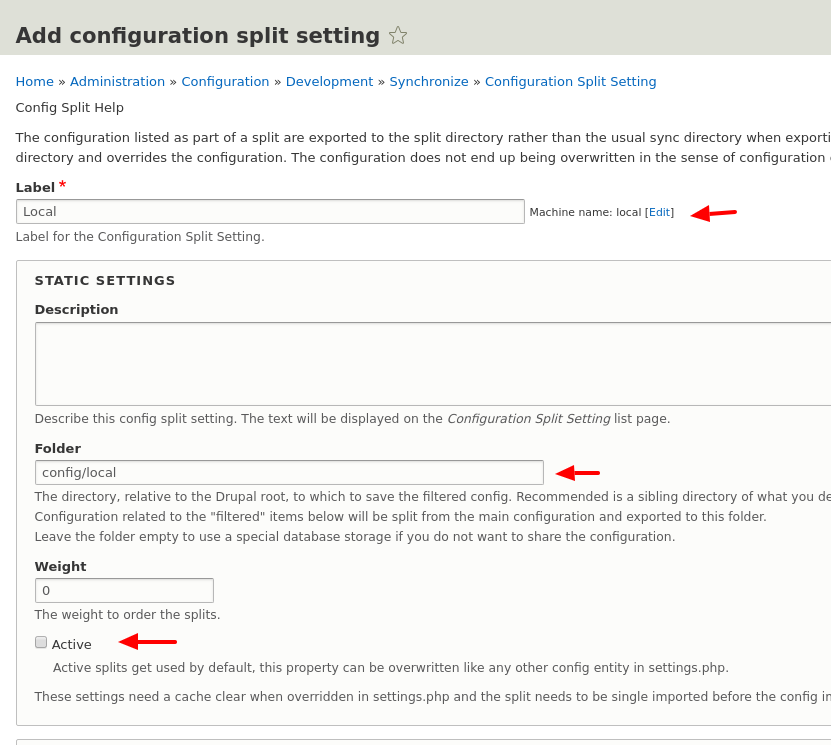
Путь к папке можно указать сразу, если путь одинаковый на всех инстансах. Также нужно будет отключить Active галочку, мы будем включать нужную нам конфигурацию через settings.php в каждом из инстансов отдельно.
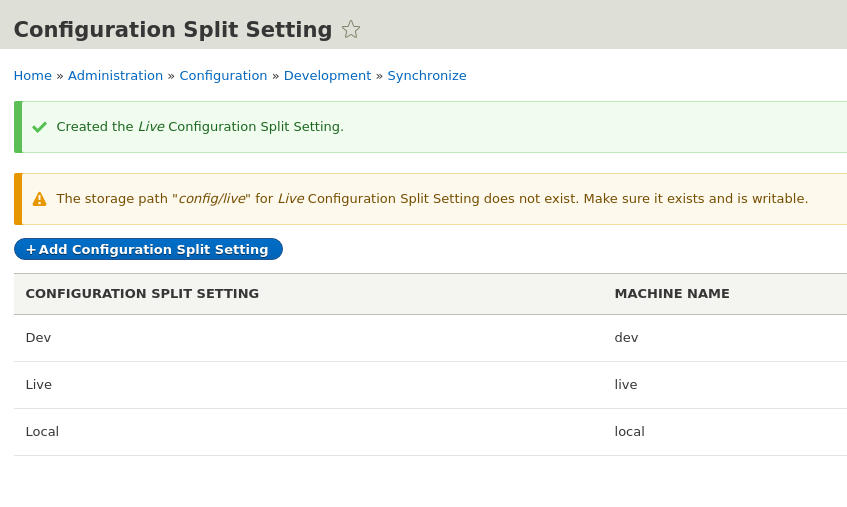
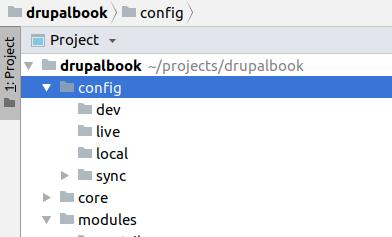
После того как мы добавили Config Split settings, нужно создать папки config/local, config/dev, config/live:

Теперь давайте включим local настройки на нашем локальном инстансе:
Соответственно для dev и live инстансов нужно будет добавить в settings.php следующие строчки:
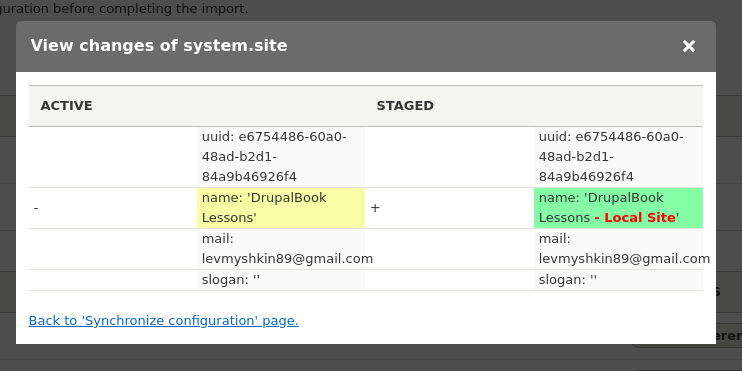
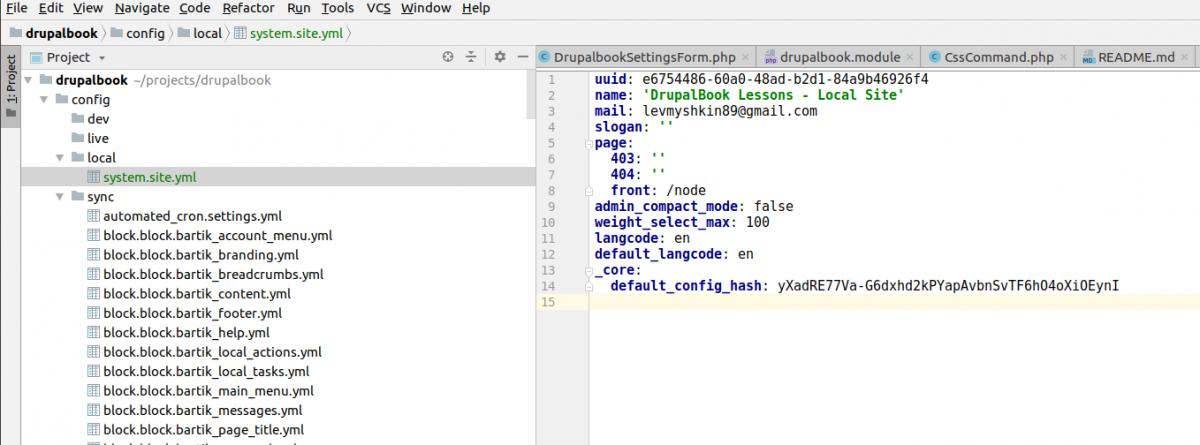
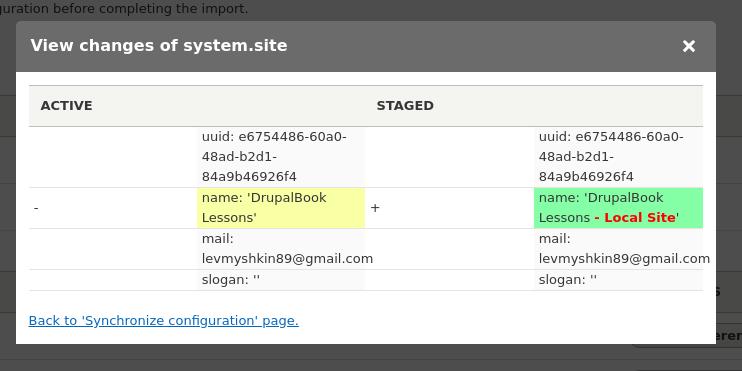
Теперь чтобы переопределить какие-то из конфигов для определенного инстанса, нужно просто скинуть нужный конфиг в нужную папку и для этого инстанса будет определен нужный отдельный конфиг. Давайте переименнуем имя сайта отдельно для локального сайта:

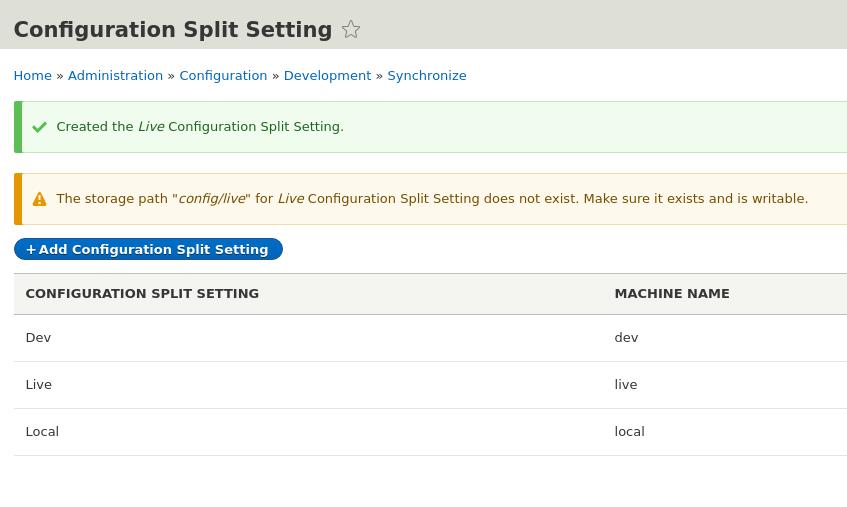
Теперь если вы зайдете на страницу Configuration Synchronization, вы увидете переопределенный конфиг:
Теперь вы можете определять разные доступы на разных инстансах для SMTP, Salesforce, систем оплаты и прочих сервисов.
Config Ignore
Возможно вам не нравится, что ваши доступы к SMTP лежат в конфигах и добавлены в Git. Тогда вы можете добавить настройки SMTP в config ignore с помощью модуля Configuration Ignore:
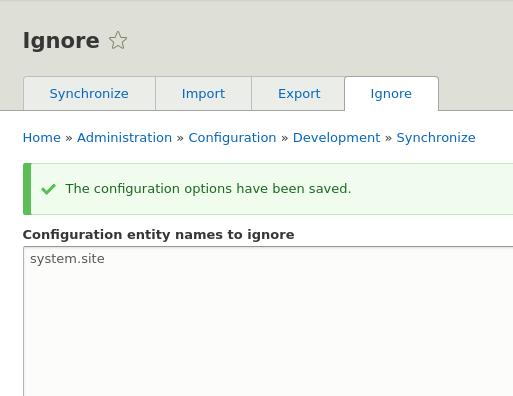
Мы использовали Config Split модуль, чтобы сделать разные настройки для названия сайта. Мы также можем добавить в игнор конфиг для system.site. Давайте зайдем на страницу настроек Config Ignore:
И добавим в ignore этот конфиг system.site: 
Теперь если вы зайдете на страницу Configuration Synchronization, то обновленные и заигнорированные конфиги будут показаны в отдельном разделе:
Drupal 8 Configuration Management with Config Split
Disclaimer: This post is written from the perspective of a Drupal 8 site that is setup using composer and hosted on Pantheon. The terminal commands shown in this post assume you have a similar setup, but even if you don’t it is likely the steps you need to perform for your site will be very similar.
Modules & Tools
If you are unfamiliar with Terminus, take a moment to review my post of Using Drush and Terminus on Pantheon.
Configuration Management
If you are unfamiliar with Drupal 8’s configuration management system, I highly recommend checking out Mike Anello’s Configuration Management presentation. He has a ton of experience teaching and training Drupal 8 developers and has recently been putting a lot of work into demystifying configuration management.
In general, the main things to know about config management are:
The most common deployment workflow is going to look like this:
And you’ll repeat this process each time you have a new set of changes to deploy.
Setup your configuration directory
To setup your project’s default configuration folder outside of the Drupal webroot, modify your settings.php file. Since this is a Pantheon hosted site, you should find a line that includes Pantheon’s additional settings file. Then we will place some code beneath that file inclusion to modify where Drupal will look for the site’s configuration files so that it looks “one folder above the webroot, in the config/sync directory”.
My First Configuration Management – Export & Import
Now that we’ve told Drupal where to store configuration files, we’re ready to manage our configuration! Let’s go through the entire workflow once to get a sense of the whole process.
Voila! You should have successfully synced your developmenet environment’s configuration with your local Drupal environment. If you’re happy with the results and want to go ahead and import your changes all the way up the chain, then you’ll need to deploy your changes through to both the “test” and “live” environments, and import your configuration to both of those environments along the way.
Config Split
As mentioned previously in this post the Config Split module solves the problem of, “what do I do if I want to have configuration differences between environments”? A common example of this problem becomes obvious when we think about developer modules such as devel, stage_file_proxy, reroute_email, or any other similar module that you’d never want to accidentally have enabled on your live website. Config Split solves this problem by allowing you to create groups of Drupal configurations that are treated differently from the rest of the configuration. These special groups of configuration are called “splits”.
The main point to take with us on our config split journey is this:
Config Split is used to enable modules and change settings throughout your environments.
This point is why we deployed our first config export with very little enabled in configuration besides the site basics. Next, we’ll use config split to enable modules and change settings for specific environments.
Don’t think about config split as a way to conditionally disable modules, or you’re going to have a bad time.
Config Split Drush Commands
The drush commands for config split are very similar to the normal configuration management commands. The most notable difference is that we’ll need to specify a split’s name each time we use the command. More on split names in the next section.
Exporting a config split:
Importing a config split:
Note: When importing a config split, not only are the split-specific configurations imported, but the shared (primary) site configuration is imported as well.
Planning our Config Splits
To get started we’ll install Config Split and its dependencies, and then setup our site to have 2 splits. We’ll call one “live”, for settings that are only needed on the live website, and the other we’ll call “dev”, for every environment that is not the live website.
The plan for the “dev” split will be simple:
And the plan for the “live” split will essentially be the opposite:
Before using Config Split, we need to create the two new directories where we will store the configuration specific to these two splits. These two folders will be siblings to the config/sync folder we setup earlier as our main configuration folder.
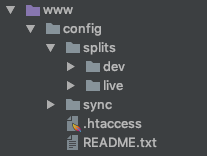 Your config folder should end up looking like this.
Now we’re ready to setup our new Config Splits.
Install and Setup Config Split
First thing we need to do is install config_filter and config_split on your local environment. If your site is setup to use composer, you can run the following commands to automatically get both modules and enable them:
Next, we want to setup 2 splits; one for development (we’ll call it “dev”) and another for the live site (we’ll call this one “live”).
Create the “Dev” Split
Create the “Live” Split
Now that our splits are setup, we’re ready to update our global configuration, and create our split specific configurations!
Exporting our Split Configurations
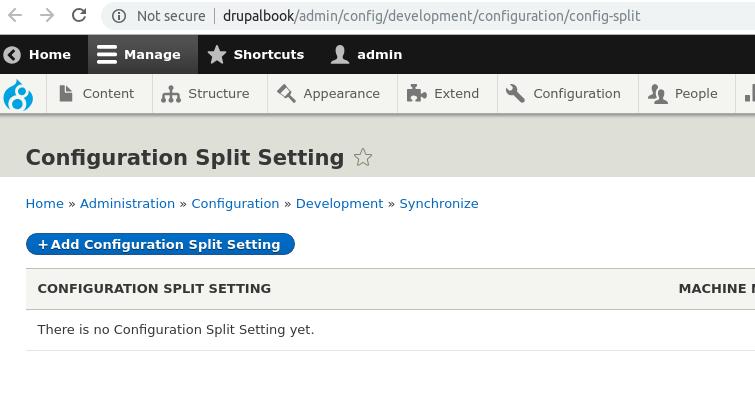
Your Config Splits list should now look something like this:
 Note that both the dev and live splits are inactive by default.
Now we need to export these splits, as well as each split’s special unique configurations. We’re going to do the following things:
Now let’s take a look at the config management directories to see what was done:
 Your config folder should now have some configuration YAML files in them.
Let’s go ahead and push these changes and deploy them throughout the environments. This step won’t actually be using the config splits yet because we don’t have any of them enabled, it will just enable the Config Split module and import our splits’ settings to all of our environments.
(Note: You’ll need to take a moment between each of these commands to allow Pantheon to have time to complete the tasks.)
Each environment should have the same configuration at this point, giving us a solid baseline before we start configuration splitting.
Enable Splits by Pantheon Environment
Next up, let’s modify our settings.php file to dynamically enable our splits based on the current Pantheon environment. We’ll put our dynamic code somewhere in the file after the line that includes settings.pantheon.php.
Note that you could use this trick to enable or disable more splits based on more (or different) conditions. The take-away here is that we let the actual hosting environment decide which splits are enabled, we never enable them by setting them as active in the Config Split UI.
Let’s commit this change and deploy it to all our environments.
Now if we look at the Config Split module’s interface in our various environments, we should see that the appropriate split is enabled for each one.
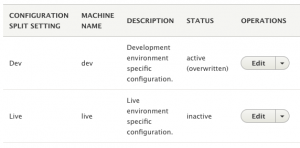 “Dev” split is enabled in the dev environment
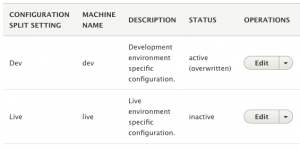 “Dev” split is enabled in the test environment.
 “Live” split is enabled in the live environment.
Split Deployments to Pantheon
Ready for this? We’re about to let our splits decide what modules should enabled and what settings should be changed on each environment.
That’s it! Now that our splits are enabled appropriately and dynamically based on the actual hosting environment, the normal Drush configuration import command will sync both the primary configuration and the enabled splits automatically.
To check our work, we just need to ensure these few things:
Conclusion
Hopefully at this point you understand the value of the Config Split module, and how you can use it to make managing your site across multiple environments much easier. It took me a good bit of research and practice to get to this level of understanding and comfort with the setup and use of the Config Split module, but now that I’ve done it a few times I am super excited to have this tool in my belt.
12.9.2. Config Split, Config Ignore делаем различные конфиги для разных инстансов.
Очень часто доступы к 3rd party сервисам должны быть различными на dev и live инстансами. Для того чтобы это сделать с помощью конфигов, нужно использовать модуль Configuration Split:
Теперь добавим split settings для local, dev, live инстансов.
Путь к папке можно указать сразу, если путь одинаковый на всех инстансах. Также нужно будет отключить Active галочку, мы будем включать нужную нам конфигурацию через settings.php в каждом из инстансов отдельно.
После того как мы добавили Config Split settings, нужно создать папки config/local, config/dev, config/live:
Теперь давайте включим local настройки на нашем локальном инстансе:
Соответственно для dev и live инстансов нужно будет добавить в settings.php следующие строчки:
Теперь чтобы переопределить какие-то из конфигов для определенного инстанса, нужно просто скинуть нужный конфиг в нужную папку и для этого инстанса будет определен нужный отдельный конфиг. Давайте переименнуем имя сайта отдельно для локального сайта:
Теперь если вы зайдете на страницу Configuration Synchronization, вы увидете переопределенный конфиг:
Теперь вы можете определять разные доступы на разных инстансах для SMTP, Salesforce, систем оплаты и прочих сервисов.
Config Ignore
Возможно вам не нравится, что ваши доступы к SMTP лежат в конфигах и добавлены в Git. Тогда вы можете добавить настройки SMTP в config ignore с помощью модуля Configuration Ignore:
Мы использовали Config Split модуль, чтобы сделать разные настройки для названия сайта. Мы также можем добавить в игнор конфиг для system.site. Давайте зайдем на страницу настроек Config Ignore:
И добавим в ignore этот конфиг system.site:
Теперь если вы зайдете на страницу Configuration Synchronization, то обновленные и заигнорированные конфиги будут показаны в отдельном разделе:
Configuration split
Config split is the standard Configuration Management Strategy provided by Acquia BLT.
Example Scenarios
Assume there is a kitchen sink website requiring all the preceding types of splits. The website is a multisite application and it will be hosted in several environments. The various environments must share some default configuration between all sites. The environments must allow some features, such as blog enablement, on some sites and not others.
Default configuration
Start by exporting the default configuration for the application. The default configuration is the configuration imported for your application, by default, even if no splits are defined or active. The default configuration will be shared by all websites using the application.
For the sake of the tutorial, let’s focus on one configuration setting: system.performance The system.performance setting controls caching and aggregation settings for Drupal core.
Run the following command:
Run the following command:
Run the following command:
Test overriding and reverting
You can test the process of importing configuration by completing the following steps:
Disable caching and aggregation.
Run the following command:
Caching and aggregation will be re-enabled, congruent with the prior exported configuration.
The preceding example is the simplest use case for the configuration management system.
Environment split
By default, you want caching, CSS, and JavaScript aggregation enabled on all environments, but you want the local environment to be an exception. You must disable caching and aggregation on local machines to speed up the development process.
To create the local environment exception, you will create a local configuration split. The following command blt recipes:config:init:splits will create the local configuration split, and automate your other environment splits. To create the “local” split manually, complete the following process:
Run the following command:
Navigate to /admin/config/development/configuration/config-split/add
In the user interface, enter values for the following fields:
Save your field changes.
Run the following command:
Run the following command:
This Drush command allows the configuration split to recognize the local split is active. You rely on Acquia BLT to display the split as active on local computers using a settings.php include.
With your local split ready, continue the following process:
Navigate to /admin/config/development/performance and disable caching and aggregation.
Run the following command:
Supported environment splits
Acquia BLT has built-in support for the following environment splits:
| Split | Environment | File path |
|---|---|---|
| local | Any non-Acquia, non-Travis environment | ../config/envs/local |
| ci | Cloud Platform pipelines feature or Travis CI | ../config/envs/ci |
| dev | Acquia Dev environment | ../config/envs/dev |
| stage | Acquia Staging environment | ../config/envs/stage |
| prod | Acquia Prod environment | ../config/envs/prod |
| ah_other | Any Acquia environment not listed here | ../config/envs/ah_other |
Acquia BLT will mark only the preceding splits as enabled if they exist, and won’t create the splits for you.
Feature split
Consider you are creating a multisite Drupal application. You want Site A and Site B to have blogs, and Site C to have no blog. You must manage the blog feature itself through configuration management.
To create the feature split, you will create a blog configuration split active on Site A and Site B, but not on Site C.
Creating a feature split
Create a blog content type.
Run the following command:
The preceding code will instruct the configuration management system to ignore the status of the blog configuration split. Ignoring the status will permit you to export a default status of false for the blog split, and still manually enable the split on selected sites without flagging the split as overwritten.
Run the following command:
Run the following command:
Enabling a feature split
Assume you want to enable the blog split for multisite Site 2, to enable the blog feature, complete the following steps:
Visit /admin/config/development/configuration/config-split and enable Blog split.
Import configuration for Site2 by running the following command:
Issues with the feature split approach
Multisite split
Consider if you want your website to have different cache lifetimes, then the default configuration specifies. You have the following two directories:
Creating a multisite split
Create a split for Site 2:
Running commands against multisites
When running a Drush command against a multisite, include the uri option. For example:
Profile split
If you are using multisite, you may want to use several installation profiles for your application. Acquia BLT will evaluate if a split exists having the same name as your active installation profile.
Miscellaneous
Exporting to an inactive split
When developing locally, you often must export to a split other than local. For instance, you may want to change some of the configuration in the dev split by using the following methods:
Conflicting configuration
Greater weight takes precedence: Where possible, you must avoid exporting the same configuration (with different values) to several splits. Exporting the same configuration is sometimes desirable. When two splits define the same configuration, the split with the greater weight will take precedence. The logic is counterintuitive, as the common Drupal convention is for elements with lesser weights to take precedence.
Several splits denylist the same configuration: If you want to export denylisted configuration in more than one split, then you must use the drush config-split-export [split] commands and specify the split to which you would like to export the configuration.
Terminology
Conditional split (graylist): Graylist splits allow a given configuration setting to export to both the default configuration and also to a split’s configuration (overriding default when active):
Graylists are also used for configuration intended to be unlocked in production (such as webforms).
Development settings
To disable the plug-in discovery cache, add the following code to your local.settings.php file:
The preceding code will prevent needing to clear caches to register a status change in a configuration split.