Многомодульный Java-проект с Gradle. Шаг за шагом
Очень много статей о Gradle написано. И со своей стороны хотелось бы добавить в копилку такую пошаговую инструкцию, прочтение которой, я надеюсь, позволит тем, кто плохо знаком с Gradle, “распробовать” и продолжить самостоятельно изучать этот инструмент.
Данная статья не будет подробно описывать такие темы, как плагины gradle (plugin), задачи (task), зависимости (dependencies), автоматическое тестирование и прочие прелести этого сборщика проектов. Во-первых, каждая тема заслуживает отдельной статьи или даже серии статей, а во-вторых, на эти темы уже есть статьи на хабре, например: Gradle: Tasks Are Code, Gradle: Better Way To Build. А еще на официальном сайте Gradle есть прекрасно написанный Gradle User Guide. Я же cфокусирую внимание на непосредственном решении поставленной задачи, и все сопутствующие темы будут описаны в рамках этой самой задачи.
Сначала определимся с целью, что же мы хотим получить на выходе? А цель указана в заголовке статьи. Мы хотим получить проект с несколькими модулями, который собирается с помощью Gradle. И так, приступим.
Шаг 1. Установка gradle
Примечение: Если выхотите просто “поиграть” с gradle, скачав файлы для статьи, или вам достались чужие исходники с волшебным файлом gradlew (gradlew.bat) в корне проекта, то устанавливать gradle не обязательно.
Gradle можно поставить, скачав последнюю версию со страницы загрузок Gradle или воспользовавшись менеджером пакетов в вашей любимой ОС (прим. Я ставил на Mac OS через brew и на Debian через apt-get из стандартных источников)
Результат первого шага:
Шаг 2. Пустой проект, плагины (plugin), обертка (wrapper)
Создадим папку проекта и в ее корне сделаем файл build.gradle со следующим содержимым:
Итоги второго шага (вывод сокращен):
Шаг 3. Заполняем пробелы
Для сравнения аналогичный блок в maven:
Итоги третьего шага:
Видно, что скачивается недостающая библиотека, и продемонстрировано ее использование.
Шаг 4. Достижение цели
Дополнение от MiniM: В gradle символ «:» используется вместо «/» и для более ветвистой структуры ссылки на проект могут выглядеть так «:loaders:xml-loader»
Итог четвертого шага:
Шаг 5 (заключительный). Убираем мусор
Основная цель достигнута, но на данном этапе могли возникнуть вполне закономерные вопросы о дублировании информации в build файлах, более глубокой настройке gradle, а также о том, что изучать дальше. Для самостоятельного изучения, я советую ознакомиться с содержимым ссылок в конце статьи. А пока, давайте приведем в порядок наши build файлы, создав build.gradle в корне проекта и изменив содержимое остальных build файлов
На этом я закончу. Надеюсь, данная статья вызвала интерес у людей, не знакомых с Gradle, и побудила к более подробному изучению и последующему использованию в своих проектах этого инструмента.
Gradle,» sourceCompatibility «vs»targetCompatibility»?
3 ответов
будьте осторожны, когда вы используете их; мы были укушены людьми, делающими предположения.
только потому, что вы используете sourceCompability (или targetCompatibility) 1.5, не означает, что вы всегда можете скомпилировать свой код с JDK 1.6 и ожидать, что он будет работать под JDK 1.5. Проблема заключается в доступных библиотеках.
Если ваш код вызывает какой-либо метод, доступный только в JDK 1.6, он все равно будет компилироваться с различными параметрами совместимости для целевой виртуальной машины. Но когда вы запустите его, он потерпит неудачу, потому что оскорбительный метод отсутствует (вы получите MethodNotFoundException или ClassNotFoundException).
по этой причине я всегда сравните настройку совместимости с фактической версией Java, которую я создаю. Если они не совпадают, я не построить.
sourceCompatibility = указывает, что версия языка программирования Java используется для компиляции .java файлы. e.g sourceCompatibility 1.6 =указывает, что версия 1.6 языка программирования Java будет использоваться для компиляции .java файлы.
по умолчанию sourceCompatibility = «версия текущей используемой JVM» и targetCompatibility = sourceCompatibility
файлы классов будут работать на цели, указанной targetCompatibility и на более поздних версиях, но не на более ранних версиях VM
Gradle, «sourceCompatibility» vs «targetCompatibility»?
sourceCompatibility is «Java version compatibility to use when compiling Java source.» targetCompatibility is «Java version to generate classes for.»
5 Answers 5
More details can be found in the javac the cross compilation section.

Be careful when you use these; we’ve been bitten by people making assumptions.
Just because you use sourceCompability (or targetCompatibility) of 1.5 doesn’t mean you can always compile your code with JDK 1.6 and expect it to work under JDK 1.5. The issue is the available libraries.
If your code happens to call some method that is only available in JDK 1.6 it will still compile with the various Compatibility options for the target VM. But when you run it, it will fail because the offending method is not present (you’ll get a MethodNotFoundException or ClassNotFoundException).
For this reason, I always compare the Compatibility setting to the actual Java version I’m building under. If they don’t match, I fail the build.

sourceCompatibility = specifies that version of the Java programming language be used to compile .java files. e.g sourceCompatibility 1.6 =specifies that version 1.6 of the Java programming language be used to compile .java files.
By default sourceCompatibility = «version of the current JVM in use» and targetCompatibility = sourceCompatibility
Class files will run on the target specified by targetCompatibility and on later versions, but not on earlier versions of the VM
Gradle, «sourceCompatibility» и «targetCompatibility»?
ОТВЕТЫ
Ответ 1
Ответ 2
Будьте осторожны, когда вы их используете; нас укусили люди, делающие предположения.
Просто потому, что вы используете sourceCompability (или targetCompatibility) 1.5, не означает, что вы всегда можете скомпилировать свой код с JDK 1.6 и ожидать, что он будет работать под JDK 1.5. Проблема заключается в доступных библиотеках.
Если ваш код вызывает вызов некоторого метода, который доступен только в JDK 1.6, он все равно будет компилироваться с различными параметрами совместимости для целевой виртуальной машины. Но когда вы запустите его, он будет терпеть неудачу, потому что метод нарушения отсутствует (вы получите исключение MethodNotFoundException или ClassNotFoundException).
По этой причине я всегда сравниваю параметр Compatibility с фактической версией Java, на которой я строю. Если они не совпадают, я не могу выполнить сборку.
Ответ 3
sourceCompatibility= указывает, что версия языка программирования Java используется для компиляции файлов .java. Например, sourceCompatibility 1.6 = указывает, что версия 1.6 языка программирования Java используется для компиляции файлов .java.
По умолчанию sourceCompatibility = «версия текущей JVM в использовании» и targetCompatibility = sourceCompatibility
Файлы классов будут запускаться на целевом объекте, указанном targetCompatibility и в более поздних версиях, но не на более ранних версиях VM
The Java Plugin
The Java plugin adds Java compilation along with testing and bundling capabilities to a project. It serves as the basis for many of the other JVM language Gradle plugins. You can find a comprehensive introduction and overview to the Java Plugin in the Building Java Projects chapter.
As indicated above, this plugin adds basic building blocks for working with JVM projects. Its feature set has been superseded by other plugins, offering more features based on your project type. Instead of applying it directly to your project, you should look into the java-library or application plugins or one of the supported alternative JVM language.
Usage
To use the Java plugin, include the following in your build script:
Tasks
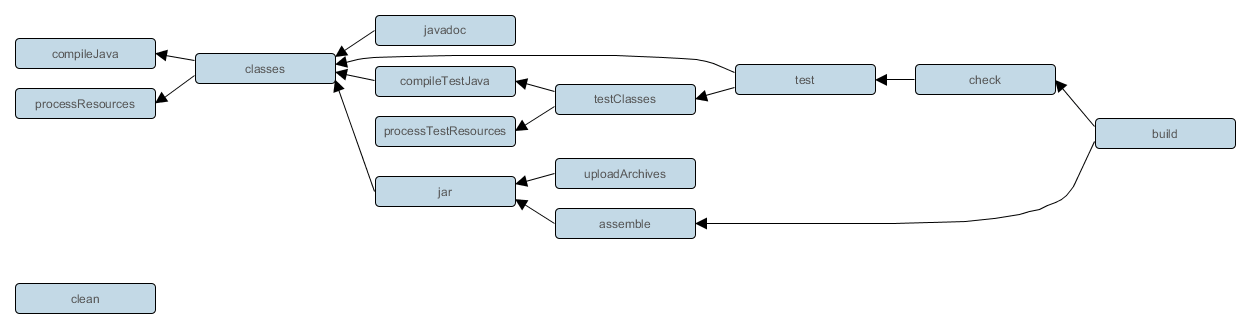
The Java plugin adds a number of tasks to your project, as shown below.
Depends on: All tasks which contribute to the compilation classpath, including jar tasks from projects that are on the classpath via project dependencies
Compiles production Java source files using the JDK compiler.
Copies production resources into the production resources directory.
This is an aggregate task that just depends on other tasks. Other plugins may attach additional compilation tasks to it.
Compiles test Java source files using the JDK compiler.
Copies test resources into the test resources directory.
This is an aggregate task that just depends on other tasks. Other plugins may attach additional test compilation tasks to it.
Depends on: classes
Assembles the production JAR file, based on the classes and resources attached to the main source set.
Depends on: classes
Generates API documentation for the production Java source using Javadoc.
Runs the unit tests using JUnit or TestNG.
Deletes the project build directory.
Deletes files created by the specified task. For example, cleanJar will delete the JAR file created by the jar task and cleanTest will delete the test results created by the test task.
SourceSet Tasks
For each source set you add to the project, the Java plugin adds the following tasks:
Depends on: All tasks which contribute to the source set’s compilation classpath
Compiles the given source set’s Java source files using the JDK compiler.
Copies the given source set’s resources into the resources directory.
Prepares the given source set’s classes and resources for packaging and execution. Some plugins may add additional compilation tasks for the source set.
Lifecycle Tasks
The Java plugin attaches some of its tasks to the lifecycle tasks defined by the Base Plugin — which the Java Plugin applies automatically — and it also adds a few other lifecycle tasks:
Aggregate task that assembles all the archives in the project. This task is added by the Base Plugin.
Aggregate tasks that performs a full build of the project. This task is added by the Base Plugin.
Performs a full build of the project and all projects it depends on.
Performs a full build of the project and all projects which depend upon it.
Depends on: all tasks that generate the artifacts attached to the named — ConfigName — configuration
Assembles the artifacts for the specified configuration. This rule is added by the Base Plugin.
Depends on: all tasks that generate the artifacts attached to the named — ConfigName — configuration
Assembles and uploads the artifacts in the specified configuration. This rule is added by the Base Plugin.
The following diagram shows the relationships between these tasks.
Project layout
The Java plugin assumes the project layout shown below. None of these directories need to exist or have anything in them. The Java plugin will compile whatever it finds, and handles anything which is missing.
Production Java source.
Production resources, such as XML and properties files.
Java source for the source set named sourceSet.
Resources for the source set named sourceSet.
Changing the project layout
You configure the project layout by configuring the appropriate source set. This is discussed in more detail in the following sections. Here is a brief example which changes the main Java and resource source directories.
Source sets
The plugin adds the following source sets:
Contains the production source code of the project, which is compiled and assembled into a JAR.
Contains your test source code, which is compiled and executed using JUnit or TestNG. These are typically unit tests, but you can include any test in this source set as long as they all share the same compilation and runtime classpaths.
Source set properties
The following table lists some of the important properties of a source set. You can find more details in the API documentation for SourceSet.
The name of the source set, used to identify it.
The output files of the source set, containing its compiled classes and resources.
output.classesDirs — (read-only) FileCollection
The directories to generate the classes of this source set into. May contain directories for other JVM languages, e.g. build/classes/kotlin/main.
The directory to generate the resources of this source set into.
The classpath to use when compiling the source files of this source set.
The processor path to use when compiling the source files of this source set.
The classpath to use when executing the classes of this source set.
java.srcDirs — Set
The source directories containing the Java source files of this source set. You can set this to any value that is described in this section.
The directory to generate compiled Java sources into. You can set this to any value that is described in this section.
resources.srcDirs — Set
Default value: [src/$name/resources]
The directories containing the resources of this source set. You can set this to any type of value that is described in this section.
Default value: Same as java property
All Java files of this source set. Some plugins, such as the Groovy Plugin, add additional Java source files to this collection.
Default value: Sum of everything in the resources and java properties
All source files of this source set of any language. This includes all resource files and all Java source files. Some plugins, such as the Groovy Plugin, add additional source files to this collection.
Defining new source sets
See the integration test example in the Testing in Java & JVM projects chapter.
Some other simple source set examples
Adding a JAR containing the classes of a source set:
Generating Javadoc for a source set:
Adding a test suite to run the tests in a source set:
Dependency management
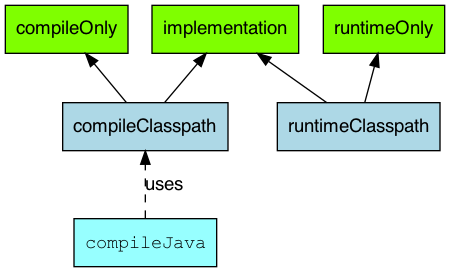
The Java plugin adds a number of dependency configurations to your project, as shown below. Tasks such as compileJava and test then use one or more of those configurations to get the corresponding files and use them, for example by placing them on a compilation or runtime classpath.
Dependency configurations
To find information on the api configuration, please consult the Java Library Plugin reference documentation and Dependency Management for Java Projects.
Implementation only dependencies.
Compile time only dependencies, not used at runtime.
compileClasspath extends compileOnly, implementation
Annotation processors used during compilation.
Runtime only dependencies.
runtimeClasspath extends runtimeOnly, implementation
Runtime classpath contains elements of the implementation, as well as runtime only elements.
testImplementation extends implementation
Implementation only dependencies for tests.
Additional dependencies only for compiling tests, not used at runtime.
testCompileClasspath extends testCompileOnly, testImplementation
testRuntimeOnly extends runtimeOnly
Runtime only dependencies for running tests.
testRuntimeClasspath extends testRuntimeOnly, testImplementation
Artifacts (e.g. jars) produced by this project. Used by Gradle to determine «default» tasks to execute when building.
default extends runtimeElements
The default configuration used by a project dependency on this project. Contains the artifacts and dependencies required by this project at runtime.
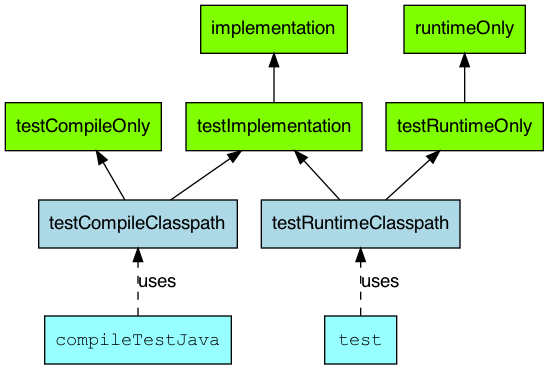
The following diagrams show the dependency configurations for the main and test source sets respectively. You can use this legend to interpret the colors:
Gray text — the configuration is deprecated.
Green background — you can declare dependencies against the configuration.
Blue-gray background — the configuration is for consumption by tasks, not for you to declare dependencies.
Light blue background with monospace text — a task.
For each source set you add to the project, the Java plugins adds the following dependency configurations:
SourceSet dependency configurations
Compile time only dependencies for the given source set, not used at runtime.
sourceSetCompileClasspath extends sourceSetCompileOnly, sourceSetImplementation
Annotation processors used during compilation of this source set.
Runtime only dependencies for the given source set.
sourceSetRuntimeClasspath extends sourceSetRuntimeOnly, sourceSetImplementation
Runtime classpath contains elements of the implementation, as well as runtime only elements.
Contributed extension
The Java plugin adds the java extension to the project. This allows to configure a number of Java related properties inside a dedicated DSL block.
Java version compatibility to use when compiling Java source. Default value: version of the current JVM in use.
Directory properties
The name of the directory to generate reports into, relative to the build directory. Default value: reports
(read-only) File reportsDir
The directory to generate reports into. Default value: buildDir/reporting.baseDir
(read-only) File testResultsDir
The name of the directory to generate the test report into, relative to the reports directory. Default value: tests
(read-only) File testReportDir
The directory to generate the test report into. Default value: reportsDir/testReportDirName
The name of the directory to generate libraries into, relative to the build directory. Default value: libs
(read-only) File libsDir
The directory to generate libraries into. Default value: buildDir/libsDirName
The name of the directory to generate distributions into, relative to the build directory. Default value: distributions
(read-only) File distsDir
The directory to generate distributions into. Default value: buildDir/distsDirName
The name of the directory to generate documentation into, relative to the build directory. Default value: docs
(read-only) File docsDir
The directory to generate documentation into. Default value: buildDir/docsDirName
The name of the directory to use to cache source dependency information, relative to the build directory. Default value: dependency-cache
Other properties
Contains the project’s source sets. Default value: Not null SourceSetContainer
The basename to use for archives, such as JAR or ZIP files. Default value: projectName
The manifest to include in all JAR files. Default value: an empty manifest.
Convention properties (deprecated)
The Java Plugin adds a number of convention properties to the project. You can use these properties in your build script as though they were properties of the project object. These are deprecated and superseded by the extension described above. See the JavaPluginConvention DSL documentation for information on them.
Testing
See the Testing in Java & JVM projects chapter for more details.
Publishing
A SoftwareComponent for publishing the production JAR created by the jar task. This component includes the runtime dependency information for the JAR.
Incremental Java compilation
Gradle comes with a sophisticated incremental Java compiler that is active by default.
This gives you the following benefits
Incremental builds are much faster.
The smallest possible number of class files are changed. Classes that don’t need to be recompiled remain unchanged in the output directory. An example scenario when this is really useful is using JRebel — the fewer output classes are changed the quicker the JVM can use refreshed classes.
To help you understand how incremental compilation works, the following provides a high-level overview:
Gradle will recompile all classes affected by a change.
A class is affected if it has been changed or if it depends on another affected class. This works no matter if the other class is defined in the same project, another project or even an external library.
A class’s dependencies are determined from type references in its bytecode or symbol analysis via a compiler plugin.
Since source-retention annotations are not visible in bytecode, changes to a source-retention annotation will result in full recompilation.
You can improve incremental compilation performance by applying good software design principles like loose coupling. For instance, if you put an interface between a concrete class and its dependents, the dependent classes are only recompiled when the interface changes, but not when the implementation changes.
The class analysis is cached in the project directory, so the first build after a clean checkout can be slower. Consider turning off the incremental compiler on your build server.
The class analysis is also an output stored in the build cache, which means that if a compilation output is fetched from the build cache, then the incremental compilation analysis will be too and the next compilation will be incremental.
Known issues
If a compile task fails due to a compile error, it will do a full compilation again the next time it is invoked.
If you are using an annotation processor that reads resources (e.g. a configuration file), you need to declare those resources as an input of the compile task.
If a resource file is changed, Gradle will trigger a full recompilation.
Incremental annotation processing
Starting with Gradle 4.7, the incremental compiler also supports incremental annotation processing. All annotation processors need to opt in to this feature, otherwise they will trigger a full recompilation.
Making an annotation processor incremental
Please first have a look at incremental Java compilation, as incremental annotation processing builds on top of it.
Gradle supports incremental compilation for two common categories of annotation processors: «isolating» and «aggregating». Please consult the information below to decide which category fits your processor.
You can then register your processor for incremental compilation using a file in the processor’s META-INF directory. The format is one line per processor, with the fully qualified name of the processor class and its case-insensitive category separated by a comma.
Example: Registering incremental annotation processors
If your processor can only decide at runtime whether it is incremental or not, you can declare it as «dynamic» in the META-INF descriptor and return its true type at runtime using the Processor#getSupportedOptions() method.
Example: Registering incremental annotation processors dynamically
Both categories have the following limitations:
They must generate their files using the Filer API. Writing files any other way will result in silent failures later on, as these files won’t be cleaned up correctly. If your processor does this, it cannot be incremental.
«Isolating» annotation processors
Example: An isolated annotation processor
«Isolating» processors have the following limitations:
They must make all decisions (code generation, validation messages) for an annotated type based on information reachable from its AST. This means you can analyze the types’ super-class, method return types, annotations etc., even transitively. But you cannot make decisions based on unrelated elements in the RoundEnvironment. Doing so will result in silent failures because too few files will be recompiled later. If your processor needs to make decisions based on a combination of otherwise unrelated elements, mark it as «aggregating» instead.
They must provide exactly one originating element for each file generated with the Filer API. If zero or many originating elements are provided, Gradle will recompile all source files.
When a source file is recompiled, Gradle will recompile all files generated from it. When a source file is deleted, the files generated from it are deleted.
«Aggregating» annotation processors
Example: An aggregating annotation processor
«Aggregating» processors have the following limitations:
They can only read CLASS or RUNTIME retention annotations
Gradle will always reprocess (but not recompile) all annotated files that the processor was registered for. Gradle will always recompile any files the processor generates.
State of support in popular annotation processors
Many popular annotation processors support incremental annotation processing (see the table below). Check with the annotation processor project directly for the most up-to-date information and documentation.